# Economize Documentation

This documentation serves as the central place to get started with AI & Cloud Cost Monitoring with Economize, including configuration references and how-to-use feature guides.

<table data-view="cards"><thead><tr><th></th><th></th><th data-hidden data-card-target data-type="content-ref"></th><th data-hidden data-card-cover data-type="image">Cover image</th></tr></thead><tbody><tr><td><strong>GCP + Economize</strong></td><td>Integrate GCP project with Economize</td><td><a href="/pages/oXeVKp8WnhaLlDWmqnHL">/pages/oXeVKp8WnhaLlDWmqnHL</a></td><td><a href="/files/6tLI8kSq45WQH9epJR3B">/files/6tLI8kSq45WQH9epJR3B</a></td></tr><tr><td><strong>AWS + Economize</strong></td><td>Integrate AWS account with Economize</td><td><a href="/pages/DeDBx6J6TJykCtxddA9j">/pages/DeDBx6J6TJykCtxddA9j</a></td><td><a href="/files/xH2UvjXb7PaHsKGj97ia">/files/xH2UvjXb7PaHsKGj97ia</a></td></tr><tr><td><strong>Azure + Economize</strong></td><td>Integrate Azure account with Economize</td><td><a href="/pages/bVBa99kclRwN9rXb5wqd">/pages/bVBa99kclRwN9rXb5wqd</a></td><td><a href="/files/lfrUkUVYnxXDnBQJ48Or">/files/lfrUkUVYnxXDnBQJ48Or</a></td></tr><tr><td><strong>AI + Economize</strong></td><td>Integrate OpenAI &#x26; Anthropic accounts with Economize</td><td><a href="/pages/BtAme6ePtTqdkSPycShN">/pages/BtAme6ePtTqdkSPycShN</a></td><td><a href="/files/ME9eXLm5Fbl2d48kVl7h">/files/ME9eXLm5Fbl2d48kVl7h</a></td></tr><tr><td><strong>Account Administration and Security</strong></td><td>Manage, control, and monitor all activities</td><td><a href="/pages/tbdSEMjL9BdTuDpDxLkG">/pages/tbdSEMjL9BdTuDpDxLkG</a></td><td><a href="/files/qXBPvaJCYOmYkY3E7whz">/files/qXBPvaJCYOmYkY3E7whz</a></td></tr><tr><td><strong>Product Features</strong></td><td>Unlock the full potential of Economize</td><td><a href="/pages/rIgXtvELUUa9WN0urPlM">/pages/rIgXtvELUUa9WN0urPlM</a></td><td><a href="/files/QBC8v7nBFVqnUchFLdhq">/files/QBC8v7nBFVqnUchFLdhq</a></td></tr><tr><td><strong>Integrations</strong></td><td>Get cloud cost insights right in your collaboration hub</td><td><a href="/pages/uCl6lmlhMxrzbk8UZfbH">/pages/uCl6lmlhMxrzbk8UZfbH</a></td><td><a href="/files/ZEDHCiyCd0qL4iFbavuO">/files/ZEDHCiyCd0qL4iFbavuO</a></td></tr></tbody></table>

{% hint style="info" %}
Got questions? We've got answers! \
Drop us a line at <support@economize.cloud> and we'll be more than happy to assist you.
{% endhint %}


# Onboarding GCP project onto Economize

After signing up with [Economize](https://www.economize.cloud/signup) to onboard your GCP project, select the **Connect GCP** option when choosing your provider, and follow these steps:&#x20;

<div data-full-width="false"><figure><img src="/files/3T7aUws5vAo2121ocgbt" alt="" width="563"><figcaption></figcaption></figure></div>

## Step 1: Add GCP configuration information

#### Add Project ID

Enter the project ID that you wish to initially onboard onto Economize. We recommend you to enter the project ID of the main GCP project.

#### **Add BigQuery dataset ID**

You can use an existing BigQuery dataset or create a new one dedicated specifically for importing cloud billing data by following these [instructions](https://cloud.google.com/bigquery/docs/datasets#create-dataset). &#x20;

In the GCP console, navigate to [BigQuery](https://console.cloud.google.com/bigquery), and in the **Dataset info** screen of BigQuery, observe the value on the **Data set ID** line and copy and paste it into the provided field during the onboarding process.

<div data-full-width="false"><figure><img src="/files/HNTo702Is3jeJtZF1fx5" alt="" width="563"><figcaption></figcaption></figure></div>

## Step 2: Enable cloud billing export to the BigQuery dataset <a href="#step-3-enable-cloud-billing-export-to-the-bigquery-dataset" id="step-3-enable-cloud-billing-export-to-the-bigquery-dataset"></a>

GCP provides an option to export your billing data to the BigQuery dataset. This consists of details regarding your usage, and pricing data.

1. Click the hamburger menu at the top left of the GCP console, and select **Billing**.
2. In the left **Billing navigation menu**, select **Billing Export**.
3. For both **Standard usage cost** and **Detailed usage cost**, click **EDIT SETTINGS** to enable them.
4. Configure the following settings:
   * From the **Projects** list, select the project you set up to contain your billing data.
   * For **Dataset**, select the dataset that you set up to contain your exported Cloud Billing data.
5. Click on **SAVE**.
6. Once both exports are enabled they will indicate the same as follows:

<figure><img src="/files/BxDMLobpAxSJMPKdbx7x" alt="" width="563"><figcaption></figcaption></figure>

## Step 3: Validate service account credentials

Economize uses a [service account](https://cloud.google.com/iam/docs/service-accounts) to integrate with your GCP account. You can choose to provide access either by using the **Service account managed by Economize** or by **Bringing your own service account**.

You will need to provide the service account with the required permissions as mentioned in the next two steps.

{% tabs %}
{% tab title="Service account managed by Economize" %}
When using the service account managed by Economize, you will need to copy the service account generated at the time of the onboarding process within the application and use it to provide the permission as listed in steps 4 and 5.
{% endtab %}

{% tab title="Bring your own service account" %}
When you bring your own service account you need to upload your service account's key, which Economize securely stores.

First, you need to create a service account, grant it the relevant roles, and generate a key. Make sure you create a JSON key, not P12. Once the service account and key have been created, download the key to your machine and paste it into the provided field.

Economize then parses the key, and if it's valid, you can continue forward to provide the permission as listed in steps 4 and 5.&#x20;

**Follow these steps to create a service account and generate a JSON key:**

1. Go to the [**Service Accounts page**](https://console.cloud.google.com/iam-admin/serviceaccounts?_ga=2.217475409.69001049.1599737573-1418460762.1586981009&_gac=1.37407380.1599057592.EAIaIQobChMI__vz0dnK6wIViSQrCh1_2AglEAAYASAAEgKnivD_BwE) in the console and click on **Create Service Account.**

<figure><img src="/files/qZfnsE4R8EwaHOeQWyVp" alt="" width="498"><figcaption></figcaption></figure>

2. Provide a name to the service account and click **Done** to create the service account.
3. Note down the service account email as it will be used in the next steps 4 & 5 when granting it with required permissions.
4. Navigate to the service account that you have just created, and select the three vertical dots next to it, and click on the **Manage Keys** button.
5. Click on the **Add Key** button in the **KEYS** section.

<figure><img src="/files/9vLujMN4Zxgv8NAuvAzu" alt="" width="563"><figcaption></figcaption></figure>

6. Select the **JSON** key type and click on the **Create** button.

<figure><img src="/files/igqhqvGNSCHGptq1lJeR" alt="" width="461"><figcaption></figcaption></figure>

9. The JSON key will be downloaded to your local system. Copy this key and paste it into the below-provided field during the onboarding process.

<figure><img src="/files/f7BoWd5udeZO59WjQSlE" alt="" width="563"><figcaption></figcaption></figure>
{% endtab %}
{% endtabs %}

## Step 4: Grant the viewer permission to the service account&#x20;

Navigate to the [IAM console](https://console.cloud.google.com/iam-admin/iam), and complete the steps below to grant the service account permission to access project resources.

1. At the top of the IAM console, select the project whose ID you entered in the first step.
2. Configure the permission as follows:

   * In the center of the page, under **Permissions for project "My Project XYZ"**, click **+ GRANT ACCESS**.
   * In the **New principals** field, under **Add principals**, paste the value of the service account based on your selected access method in Step 3.
   * In the **Role** field, under **Assign roles**, search for and select **Viewer**.

   <figure><img src="/files/KuvvprktSmDqdhvLZSO9" alt="" width="563"><figcaption></figcaption></figure>
3. Click on **SAVE**.

## Step 5: Assign BigQuery Data Editor role to the service account

Go to [BigQuery](https://console.cloud.google.com/bigquery), and complete the following steps to permit the service account to access the BigQuery dataset.

1. At the top of the BigQuery console, ensure the project containing the BigQuery dataset whose ID you entered in the first step is selected, then navigate to the **Explorer** panel, and select your project to expand it.
2. Configure the permission as follows:

   * Select the three vertical dots next to the dataset name, then click **Share**.
   * On the **Share permissions** panel that appears on the right, click **+ ADD PRINCIPAL**.
   * In the **New principals** field, under **Add principals**, paste the value of the service account based on your selected access method in Step 3.
   * In the **Role** field, under **Assign roles**, search for and select **BigQuery Data Editor**.

   <figure><img src="/files/uSXwgJCcmkEhuqx74KUD" alt="" width="563"><figcaption></figcaption></figure>
3. Click on **SAVE**.

{% hint style="success" %}
**SUCCESS**

It can take up to **24–48 hours** for the data to fully propagate if the linked billing dataset was created recently.

So, you might not be able to use all the features right away but you can still utilize the [Recommendations](/product-features/recommendations) to start optimizing your costs.
{% endhint %}


# Adding new GCP projects as an existing user

## Step 1: Grant the viewer permission to the service account

{% hint style="info" %}
To import all of your projects in a particular organization at once, grant Viewer permission at Organization IAM to the service account you used during [initial onboarding](/google-cloud/onboarding).
{% endhint %}

Navigate to the [IAM console](https://console.cloud.google.com/iam-admin/iam), and complete the steps below to grant the service account permission to access project resources.

1. At the top of the IAM console, select the organization or project you wish to onboard.
2. Configure the permission as follows:

   * In the center of the page, under **Permissions for project "My Project XYZ"**, click **+ GRANT ACCESS**.
   * In the **New principals** field, under **Add principals**, paste the value of the service account you used during initial onboarding.
   * In the **Role** field, under **Assign roles**, search for and select **Viewer**.

   <figure><img src="/files/KuvvprktSmDqdhvLZSO9" alt="" width="563"><figcaption></figcaption></figure>

## Step 2: Import the project into Economize

1. From the [Cloud Providers tab](https://www.economize.cloud/app/settings/cloud_provider) navigate to the [GCP projects](https://www.economize.cloud/app/settings/cloud_provider/projects) page within settings, and click the **+ Add Projects** button.

<figure><img src="/files/MHrKXHBuUjqlJ321bonl" alt="" width="563"><figcaption></figcaption></figure>

2. Select the project you wish to onboard from the **Select projects to import** field.

<figure><img src="/files/cl9ID01xJimkSIpq5YuT" alt="" width="563"><figcaption></figcaption></figure>

3. Once selected, click on the **Onboard** button.


# Analyzing BigQuery costs by linking the logging export

Follow the below steps to create and integrate a logging sink with Economize, allowing you to analyze BigQuery costs within [Reports](/product-features/reports).

<figure><img src="/files/lZS1GW0iMkAPS72J7eyL" alt=""><figcaption></figcaption></figure>

## Step 1: Create a Logging sink

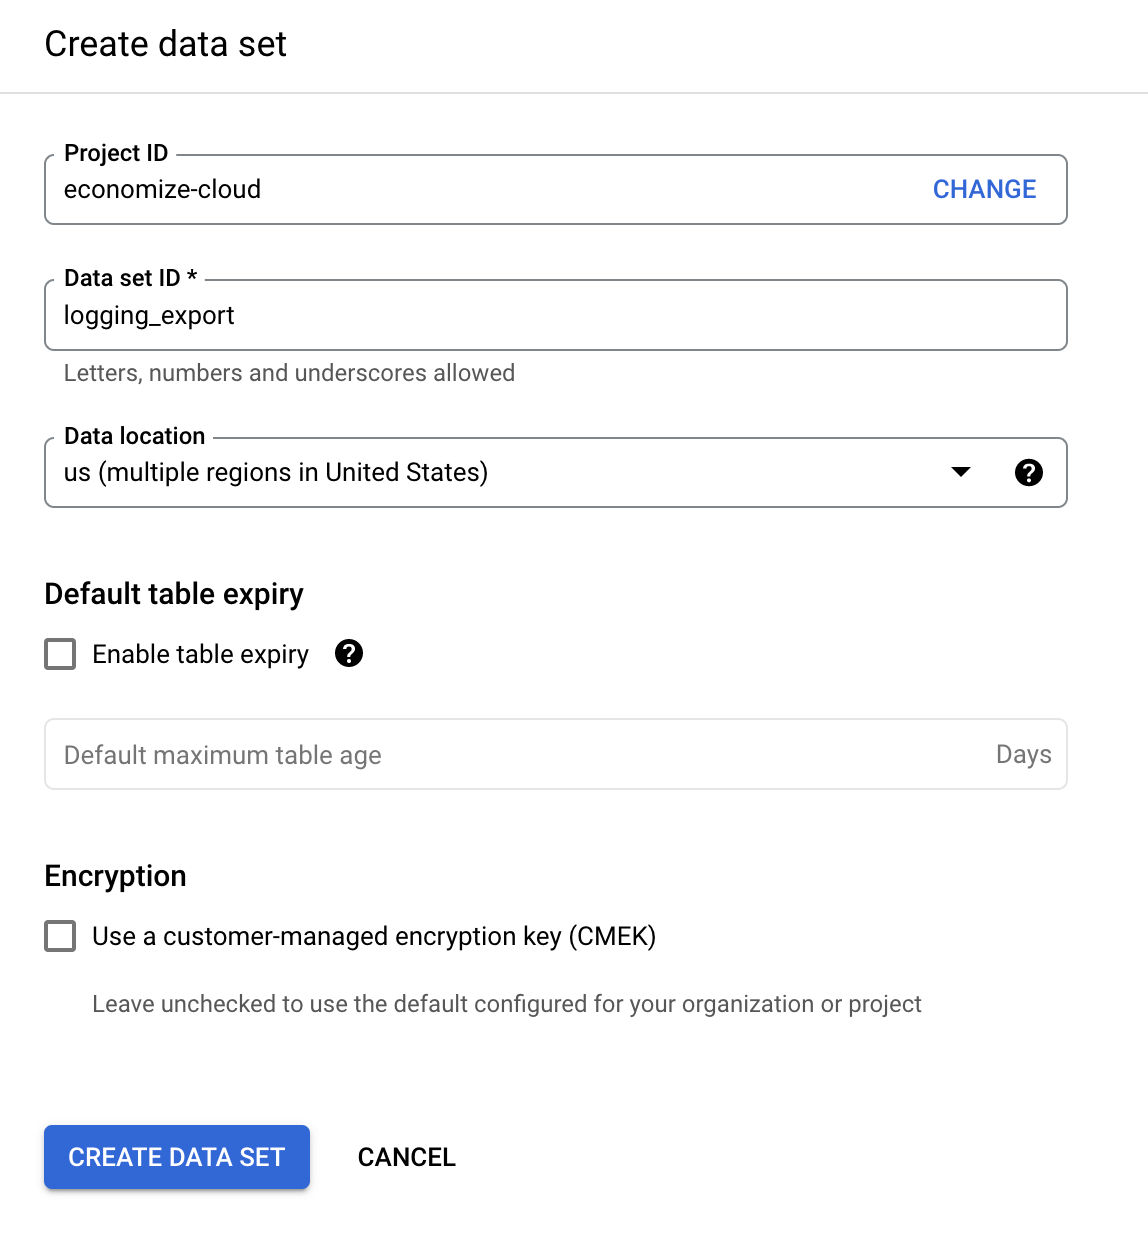
1. Navigate to the [BigQuery console](https://console.cloud.google.com/bigquery) to create a new dataset named **logging\_export** in the same project where you created the billing export dataset during onboarding.

<img src="https://ik.imagekit.io/economize/docs/dashboard/bq-cost-breakdown/pasted_image_0_r-FVjuCSQ.png" alt="" width="563">

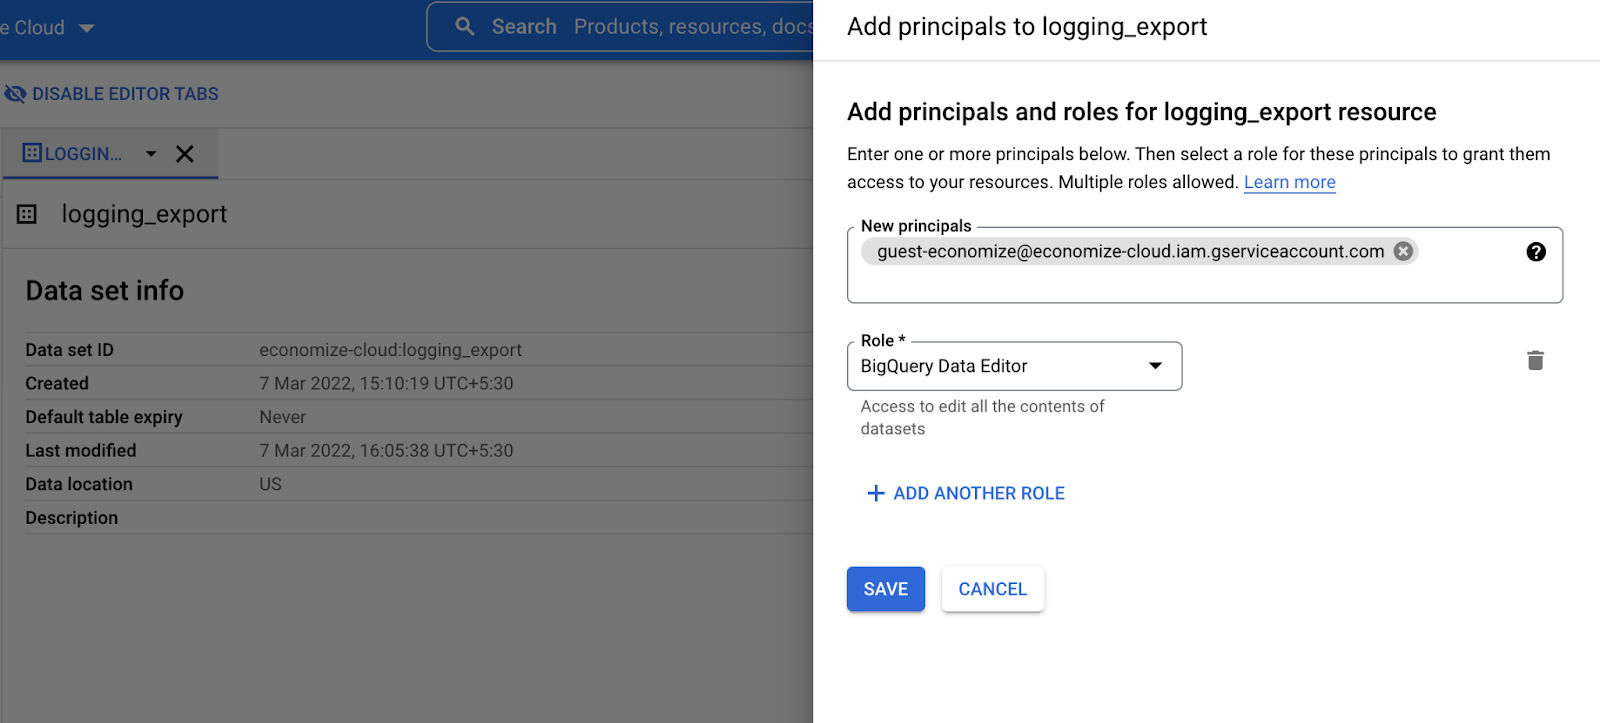
2. For this newly created dataset configure the permission as follows:

   * Select the three vertical dots next to the dataset name, then click **Share**.
   * On the **Share permissions** panel that appears on the right, click **+ ADD PRINCIPAL**.
   * In the **New principals** field, under **Add principals**, paste the value of the service account based on your selected access method during onboarding.
   * In the **Role** field, under **Assign roles**, search for and select **BigQuery Data Editor**.
   <img src="https://ik.imagekit.io/economize/docs/dashboard/bq-cost-breakdown/pasted_image_0-4_PGsZHDXsa05.png?ik-sdk-version=javascript-1.4.3&#x26;updatedAt=1647102434330" alt="" width="563">
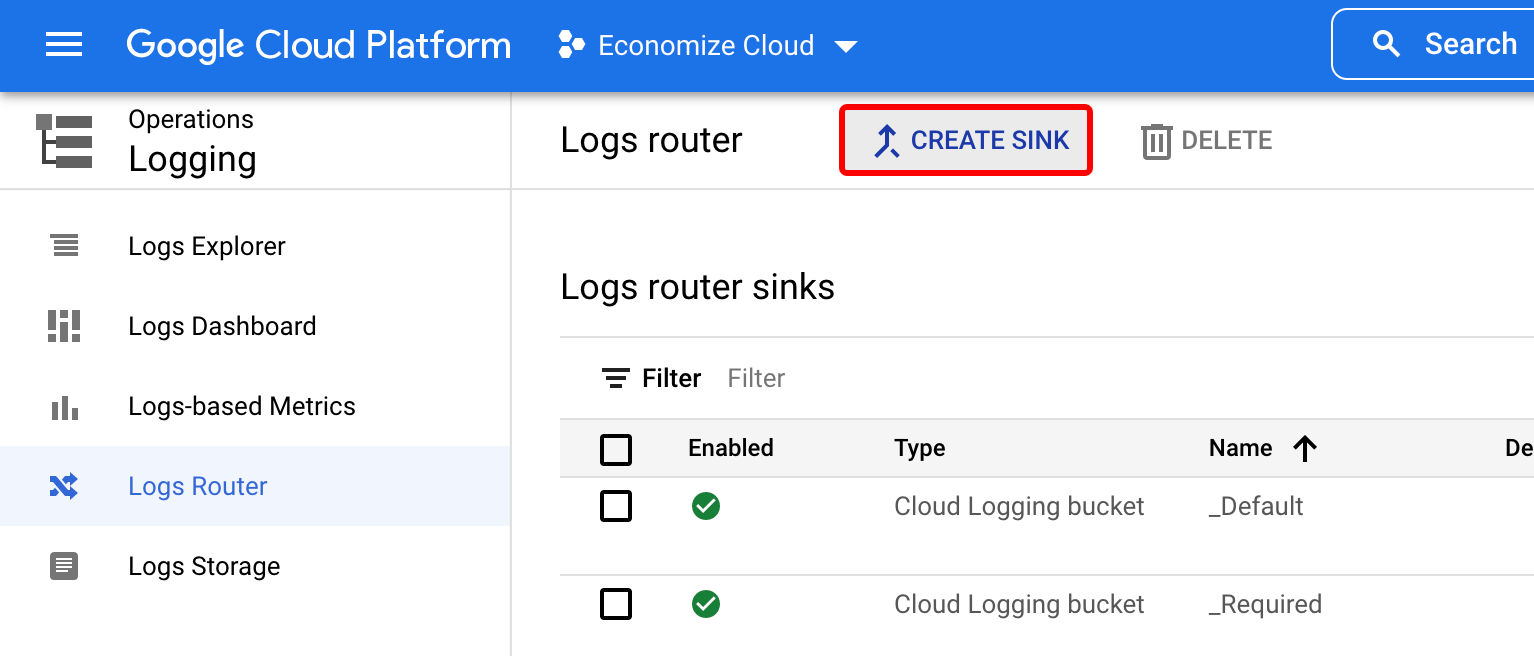
3. Now go to the [Log router](https://console.cloud.google.com/logs/router) and select **Create Sink.**
<img src="https://ik.imagekit.io/economize/docs/dashboard/bq-cost-breakdown/pasted_image_0-1_G7zAB6fg_.png?ik-sdk-version=javascript-1.4.3&#x26;updatedAt=1647102433383" alt="" width="563">

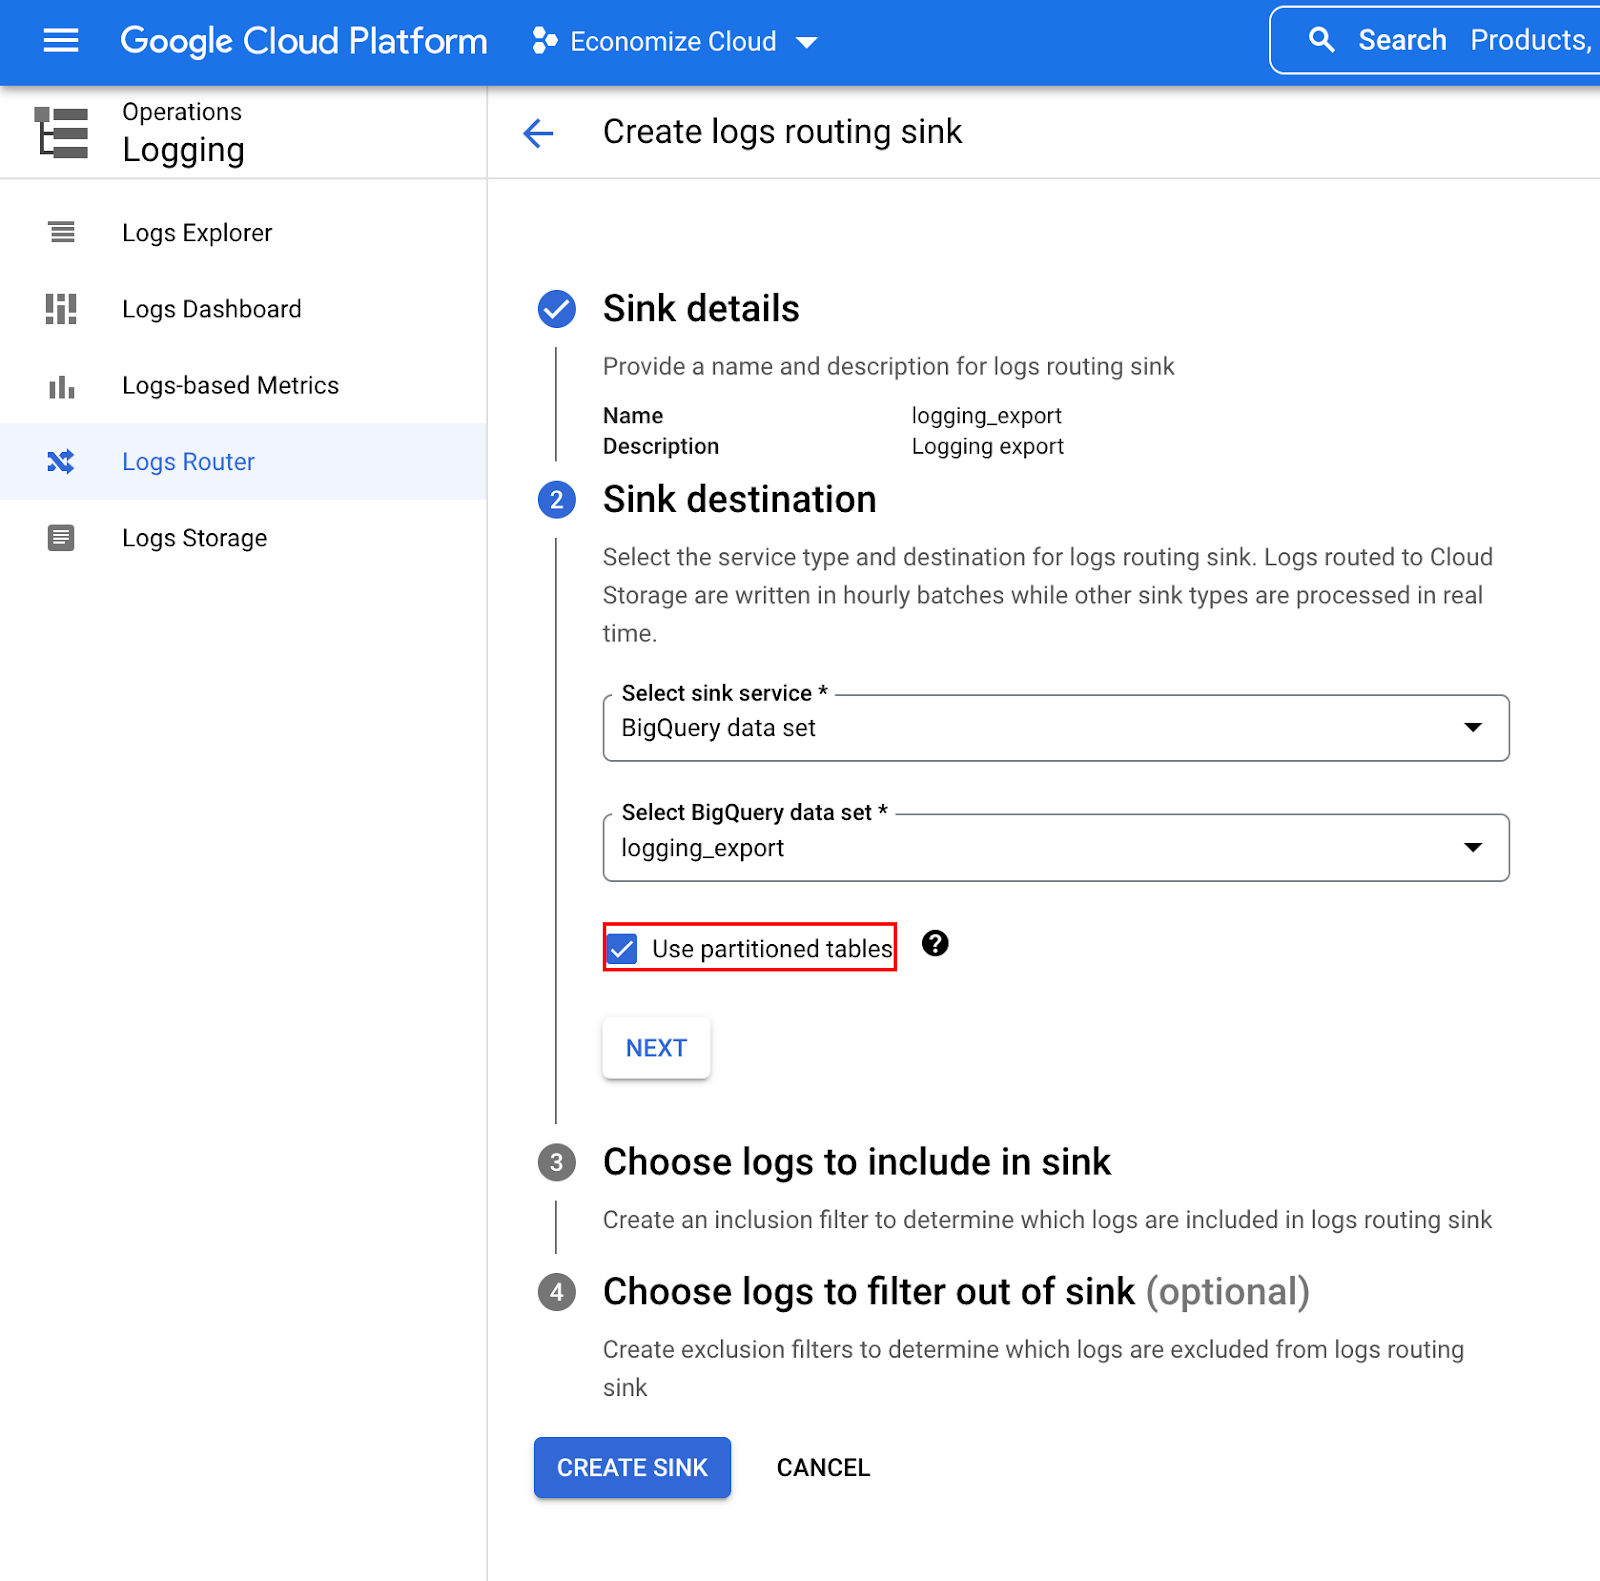
4. Provide a sink name and select the BigQuery dataset **logging\_export** that you created earlier as the destination.
5. Click on the **Use partitioned tables** checkbox in the form.
<img src="https://ik.imagekit.io/economize/docs/dashboard/bq-cost-breakdown/pasted_image_0-2_DNazA4a2Z.png?ik-sdk-version=javascript-1.4.3&#x26;updatedAt=1647102433762" alt="" width="563">

6. Provide the below inclusion filter in Step 3 when asked to **Choose logs to include in sink**.

{% code title="Inclusion filter" overflow="wrap" fullWidth="false" %}

```
protoPayload.serviceName="bigquery.googleapis.com" AND protoPayload.methodName="jobservice.jobcompleted"
```

{% endcode %}
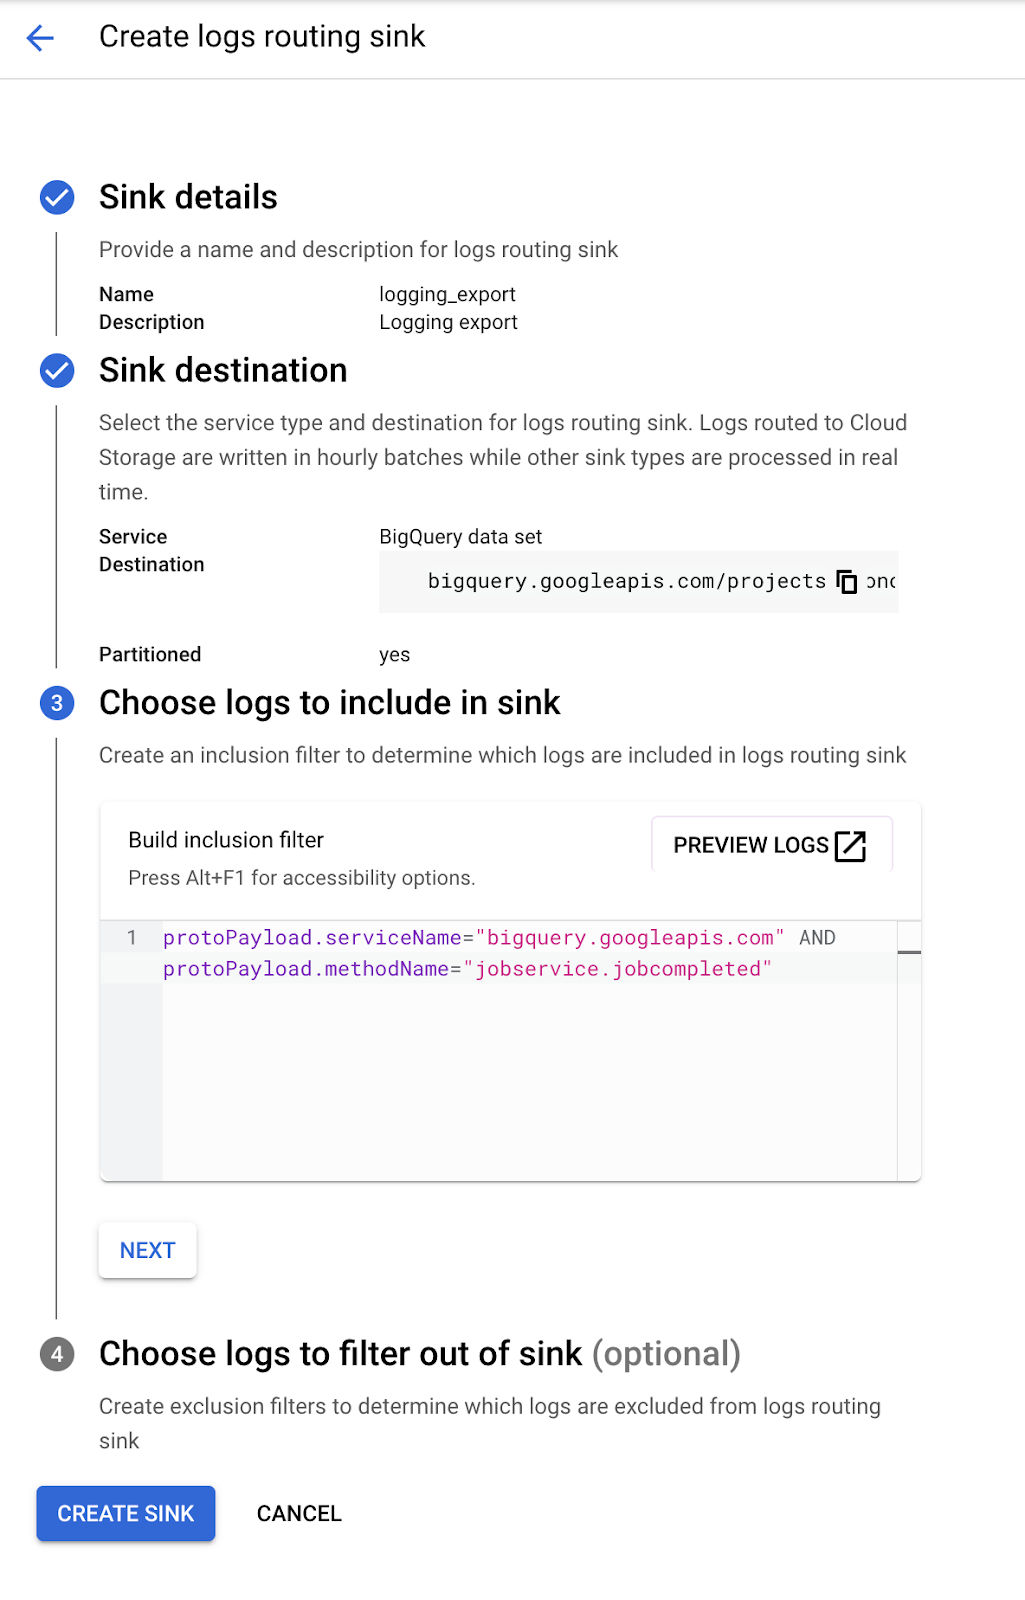
<img src="https://ik.imagekit.io/economize/docs/dashboard/bq-cost-breakdown/pasted_image_0-3_AmRGC_DCN.png?ik-sdk-version=javascript-1.4.3&#x26;updatedAt=1647102433859" alt="" width="563">

7. Leave the exclusion filter empty and click on **Create Sink**.

## Step 2: Integrate Logging sink with Economize <a href="#integrating-logging-sink" id="integrating-logging-sink"></a>

1. Navigate to the [**Projects page**](https://www.economize.cloud/app/settings/projects) from the settings of the Economize console.

<figure><img src="/files/hcM1qWsTqPdbH5iGRyEq" alt="" width="563"><figcaption></figcaption></figure>

2. Click on the pen icon for the project you wish to analyze the BigQuery costs.
3. Enter the **Dataset ID** of the BigQuery dataset you created in step 1 in the following text field.

<figure><img src="/files/aEOwDkac1Hpv1q90rALS" alt="" width="563"><figcaption></figcaption></figure>

4. Test your connection to the dataset by clicking on the test button.

<img src="https://ik.imagekit.io/economize/docs/dashboard/bq-cost-breakdown/Screenshot_2022-03-12_at_6.23.03_PM_DLdMrWAJG.png?ik-sdk-version=javascript-1.4.3&#x26;updatedAt=1647103502565" alt="" width="563">

5. Click on the **Save Changes** button.

{% hint style="success" %}
**SUCCESS**

You can now navigate to the [Reports](https://www.economize.cloud/app/gcp/reports) within the Economize console and start analyzing the BigQuery costs.
{% endhint %}


# Analyzing GKE costs

Follow the below steps to enable GKE cost allocation and integrate detailed usage cost export with Economize, allowing you to analyze GKE costs within [Reports](/product-features/reports).

## Step 1: Enable GKE cost allocation

Refer to the official GCP documentation below to enable GKE cost allocation for all the clusters of a project for which you wish to analyze costs within the Economize console.

{% embed url="<https://cloud.google.com/kubernetes-engine/docs/how-to/cost-allocations#enable_breakdown>" fullWidth="false" %}

## Step 2: Enable detailed usage cost export

{% hint style="info" %}
You can skip step 2 if you already enabled the Detailed usage cost export during [onboarding](https://docs.economize.cloud/gcp-onboarding/integrating-a-gcp-project-with-economize#step-3-enable-cloud-billing-export-to-the-bigquery-dataset).&#x20;
{% endhint %}

GCP provides an option to export your billing data to the BigQuery dataset. This consists of details regarding your usage, and pricing data.

1. Click the hamburger menu at the top left of the GCP console, and select **Billing**.
2. In the left **Billing navigation menu**, select **Billing Export**.
3. For **Detailed usage cost**, click **EDIT SETTINGS** to enable them.
4. Configure the following settings in accordance with the steps you performed during onboarding:
   * From the **Projects** list, select the project you set up to contain your billing data.
   * For **Dataset**, select the dataset that you set up to contain your exported Cloud Billing data during onboarding.
5. Click on **SAVE**.
6. Once the export is enabled it will indicate the same as follows.

<figure><img src="/files/E5cnIcY6EHGbM8kyfvdJ" alt="" width="563"><figcaption></figcaption></figure>

## Step 3: Link the billing dataset with Economize

1. Navigate to the [Projects page](https://www.economize.cloud/app/settings/projects) within Economize settings, and click on the Pen icon of the project you enabled GKE cost allocation in step 1, to update its configuration.
2. Enter the **Dataset ID** of the BigQuery dataset you used in step 2 in the following text field.

<figure><img src="/files/fH2dg1fAiQgvdMtKNoGh" alt="" width="563"><figcaption></figcaption></figure>

3. Test your connection to the dataset by clicking on the **Test** button.
4. Click on the **Save Changes** button.

<figure><img src="/files/duf70ldhqfqai07lR3CW" alt="" width="483"><figcaption></figcaption></figure>

{% hint style="success" %}
**SUCCESS**

You can now navigate to the [Reports](https://www.economize.cloud/app/gcp/reports) within the Economize console and start analyzing the GKE costs.
{% endhint %}


# Onboarding AWS account onto Economize

After signing up with [Economize](https://www.economize.cloud/signup) to onboard your AWS account, select the Connect AWS option when choosing your provider, and follow these steps:

<figure><img src="/files/3T7aUws5vAo2121ocgbt" alt="" width="563"><figcaption></figcaption></figure>

For Economize to connect with your AWS account, it will need access to the Cost and Usage Report (CUR) through an IAM role.

You can use an existing CUR or create a new one during onboarding.&#x20;

{% hint style="info" %}
It's required to use the [Management account](https://docs.aws.amazon.com/managedservices/latest/userguide/management-account.html) while onboarding, to onboard other accounts later on.&#x20;
{% endhint %}

{% tabs %}
{% tab title="Create & use a new CUR (recommended)" %}
For creating and using a new CUR select **Create and use a new CUR (recommended)** option when asked for the same during onboarding and follow these steps:

1. Click on **Create stack** to get redirected to AWS CloudFormation with prefilled settings that will look as follows.

<figure><img src="/files/yTDeH4O3sQ3TmRXUWxL4" alt="" width="563"><figcaption></figcaption></figure>

2. Check on the **I acknowledge that AWS CloudFormation might create IAM resources** within the blue dialog box.

3. Click on **Create stack.**

4. Once the stack has been created, the application must validate itself.

5. In case the stack has been created but not validated yet, copy the value of **RoleArn** from the Outputs field in the AWS console and paste it into the provided field during the onboarding process.<br>

   <figure><img src="/files/HwPnDVituwLGk8KGStmF" alt="" width="563"><figcaption></figcaption></figure>

6. Click on **Connect.**

<figure><img src="/files/JCxwOV4zerb8MaTwvq1f" alt="" width="563"><figcaption></figcaption></figure>

7. Once the RoleArn ID is been verified you can proceed with the next steps of onboarding.
   {% endtab %}

{% tab title="Using an existing CUR" %}
{% hint style="warning" %}
We recommend you create and use a new CUR during the onboarding if your existing CUR doesn't configure to the following settings:

* **Additional content:** Include resource IDs
* **Report data time granularity:** Hourly&#x20;
* **Report versioning:** Overwrite existing report
* **Compression type:** Parquet
* **Report data integration:** Amazon Athena
  {% endhint %}

When using an existing CUR select **Use an existing CUR** option when asked for the same during onboarding and follow these steps:

1. Select the **CUR Version** and enter the **Bucket name**, and **Region** where it's been hosted.&#x20;

<figure><img src="/files/w5jk72Zf53LKZ6DmUdbF" alt="" width="563"><figcaption></figcaption></figure>

{% hint style="info" %}
**Finding the existing S3 bucket name and region**

To locate the S3 bucket where your AWS Cost and Usage Report (CUR) is stored:

1. Go to **AWS Console** → **Billing and Cost Management** → **Data Exports**.

2. Within the **Table** view, look for the **S3 bucket** column, this lists the bucket name used for your CUR exports.

3. To find the **region**, open the **Amazon S3 Console**, select the same bucket, and check the **Region** information displayed in the bucket details section.
   {% endhint %}

4. Click on **Create stack** to get redirected to AWS CloudFormation with prefilled settings that will look as follows.

<figure><img src="/files/RbW3fms9HpBfLarSNH5o" alt="" width="563"><figcaption></figcaption></figure>

3. Check on the **I acknowledge that AWS CloudFormation might create IAM resources** within the blue dialog box.

4. Click on **Create stack.**

5. Once the stack has been created, the application must validate itself.

6. In case the stack has been created but not validated yet, copy the value of **RoleArn** from the Outputs field in the AWS console and paste it into the provided field during the onboarding process.<br>

   <figure><img src="/files/HwPnDVituwLGk8KGStmF" alt="" width="563"><figcaption></figcaption></figure>

7. Click on **Conect.**

<figure><img src="/files/JCxwOV4zerb8MaTwvq1f" alt="" width="563"><figcaption></figcaption></figure>

8. Once the RoleArn ID is been verified you can proceed with the next steps of onboarding.
   {% endtab %}
   {% endtabs %}

{% hint style="success" %}
**SUCCESS**

It can take up to 24 hours for data to fully propagate in a newly generated CUR. Once the onboarding steps are completed successfully you can utilize [Economize features](/product-features/dashboard) to gain deeper insights into your linked AWS account.
{% endhint %}


# Adding new AWS accounts as an existing user

Navigate to the [AWS Accounts page](https://www.economize.cloud/app/settings/cloud_provider/accounts) within settings, and click on the **Add Accounts** button. As an existing user, you have the option to either onboard multiple accounts or a single account as per your preference.

<figure><img src="/files/GoDn9KeRWjyXFdvu7FSJ" alt="" width="563"><figcaption></figcaption></figure>

{% tabs %}
{% tab title="Import single account" %}

1. Select **Single Account** as your import method.

<figure><img src="/files/hkMHYsbJjLx0ZjKnSlEn" alt="" width="563"><figcaption></figcaption></figure>

2. Click on the **Create Stack** button, to get redirected to AWS CloudFormation with prefilled settings that will look as follows.

<figure><img src="/files/foWAYus2G4wBICY3NAE6" alt="" width="563"><figcaption></figcaption></figure>

2. Check on the **I acknowledge that AWS CloudFormation might create IAM resources** within the blue dialog box.

<figure><img src="/files/KQMUFw5Gkbr1Au0Yl6LY" alt="" width="563"><figcaption></figcaption></figure>

3. Click on **Create stack.**
4. Once the stack has been created successfully, your account will be onboarded to Economize and you will be redirected to the dashboard.
   {% endtab %}

{% tab title="Import multiple accounts" %}

1. Select **Multiple Account** as your import method.

<figure><img src="/files/cI5XzlZ8hwQGdKZojFMi" alt=""><figcaption></figcaption></figure>

2. Click on the **Create Stack** button, to get redirected to the AWS CloudFormation page.
3. In **Step 1 (Choose a template)** of the stack creation copy and paste the value of the Amazon S3 URL into the provided field as follows, and click on **Next**.

<figure><img src="/files/Psc3KPNIs4Q5bUVt8Vsm" alt="" width="563"><figcaption></figcaption></figure>

4. In **Step 2 (Specify StackSet details)** of the stack creation copy and paste the StackSet name and other parameters i.e., CurAccountID, EconomizeDomain, EconomizeHandshakeID, EconomizeID, and EconomizeIamRole into the provided fields as follows.

<figure><img src="/files/KxUNx0Zv13NaWKpF2dkq" alt="" width="563"><figcaption></figcaption></figure>

5. In **Step 3 (Configure StackSet options)** of stack creation leave the setting as it is and click on **Next**.

<figure><img src="/files/rEw8ZHLt6MUkDMItIDQk" alt="" width="563"><figcaption></figcaption></figure>

6. In **Step 4 (Set deployment options)** of stack creation select **US East (N. Virginia)** in the Specify regions field, and click on **Next**.

<figure><img src="/files/gdxHMFdhns2ncpgGRa7T" alt="" width="563"><figcaption></figcaption></figure>

7. In **Step 5 (Review)** of stack creation check on the **I acknowledge that AWS CloudFormation might create IAM resources** within the blue dialog box, and click on **Submit**.
8. Once all the above steps have been completed come back to the Economize console and click on the **Validate** button, to verify the stack creation.

<figure><img src="/files/RhLKopUYZ1GcqePuiwou" alt="" width="563"><figcaption></figcaption></figure>

9. Once the stack has been created successfully, your accounts will be onboarded to Economize and you will be redirected to the dashboard.
   {% endtab %}
   {% endtabs %}


# Onboarding Azure account onto Economize

After signing up with [Economize](https://www.economize.cloud/signup) to connect your Azure account, select the **Connect Azure** option when choosing your provider, and follow these steps:

<figure><img src="/files/3T7aUws5vAo2121ocgbt" alt="" width="563"><figcaption></figcaption></figure>

## **Step 1: Create a New Application Registration**

1. From the [Azure portal](https://portal.azure.com/#home), search for and navigate to **Microsoft Entra ID**.
2. In the left-hand menu, under **Manage**, select **App registrations**.
3. Click **+ New registration**.

<figure><img src="/files/AhQfHkzitAWxqx8HeOai" alt="" width="563"><figcaption></figcaption></figure>

4. The **Register an application** screen will open up. For **Name**, enter **Economize**.
5. Leave all other settings as their defaults and click **Register**.

<figure><img src="/files/DP4HiJQ0n1a4cMU7P5qK" alt="" width="563"><figcaption></figcaption></figure>

6. The app details will be displayed. Record the **Application (client) ID** and **Directory (tenant) ID** as these will be required later.

<figure><img src="/files/PltoTxAFuNzdEVLJGdEw" alt="" width="563"><figcaption></figcaption></figure>

## **Step 2: Generate a Client Secret**

1. On the same page, next to the **Client credentials** field, click **Add a certificate or secret**. (You can also access the **Certificates and secrets** screen from the left-hand menu.)
2. Click on **+ New client secret**.
3. The **Add a client secret** pane will be displayed at right. For **Description**, enter a description, such as **economize-secret**.
4. For **Expires**, select an expiration option for the secret.

{% hint style="info" %}
If this secret expires, you will need to supply Economize with a new secret before the expiration date.
{% endhint %}

5. Click **Add**.

<figure><img src="/files/M86roC8MHvxwVwbtg7WW" alt="" width="563"><figcaption></figcaption></figure>

6. The newly created secret is displayed. Copy the secret's **Value** and save it somewhere to add it to the Economize console later as this value will be displayed only once.

## **Step 3: Grant the Service Principal Permissions**

{% tabs %}
{% tab title="Management group" %}
{% hint style="info" %}
Economize recommends assigning permissions to a management group that aggregates all your subscriptions. This way, all your subscriptions will be onboarded onto the platform at once.
{% endhint %}

1. From the top navigation, search for and navigate to **Management groups**.
2. Create a new one or open an existing management group for which you will be assigning permissions.
3. On the left navigation, click **Access control (IAM)**.
4. Click **Add role assignment**.

<figure><img src="/files/zCvY3S5mz9ork80hEUzR" alt="" width="563"><figcaption></figcaption></figure>

5. On the **Add role assignment** screen, select **Reader**. Then, click **Next**.

<figure><img src="/files/jXT9TT3AfNkmqWLQpr1A" alt="" width="563"><figcaption></figcaption></figure>

6. For **Assign access to**, select **User, group, or service principal**.
7. Click **+ Select members**. The **Select members** tab is displayed on the right. Search for the Economize app you created before. Select the listed app, then click **Select**.

<figure><img src="/files/H0yLAIapISJFhLsDk9nE" alt="" width="563"><figcaption></figcaption></figure>

8. Click **Next** > **Review + assign**.

<figure><img src="/files/sySxbdMEq3qswVPBI4pd" alt="" width="563"><figcaption></figcaption></figure>
{% endtab %}

{% tab title="Individual subscriptions" %}

1. From the top navigation, search for and navigate to **Subscriptions**.

<figure><img src="/files/xBgReKjBxm4xFADvvZkI" alt="" width="563"><figcaption></figcaption></figure>

2. Repeat steps 3-8 for each subscription you wish to onboard.
3. On the left navigation, click **Access control (IAM)**.
4. Click **Add role assignment**.

<figure><img src="/files/NS6AZDiHbTsAWdQ8YKhE" alt="" width="563"><figcaption></figcaption></figure>

5. On the **Add role assignment** screen, select **Reader**. Then, click **Next**.
6. For **Assign access to**, select **User, group, or service principal**.
7. Click **+ Select members**. The **Select members** tab is displayed on the right. Search for the Economize app you created before. Select the listed app, then click **Select**.
8. Click **Next > Review + assign**.

<figure><img src="/files/54bkxiJexvFrTSLtvDdp" alt="" width="563"><figcaption></figcaption></figure>
{% endtab %}
{% endtabs %}

## Step 4: Create the billing export <a href="#save-credentials" id="save-credentials"></a>

{% tabs %}
{% tab title="Billing account" %}
{% hint style="info" %}
Make sure you're on the billing scope when performing the following steps.

To ensure you're on the billing scope, check the text on your cost management screen that states **Billing account** as in the image below:

![](/files/r6Juf815rkWqaqZQ7EAE)
{% endhint %}

1. Navigate to **Cost Management + Billing**, and from **Billing scopes** select the one for which you wish to create the billing export.

<figure><img src="/files/3GHXVt2k2A9OhjVa3Qh7" alt="" width="563"><figcaption></figcaption></figure>

2. Click **Export** under **Setting** in the left-hand menu.

<figure><img src="/files/4HCUpwmW35K5opUE2T8T" alt="" width="563"><figcaption></figcaption></figure>

3. From the Export screen, click **+ Create**, and select **Create your own export**.

<figure><img src="/files/jGAWmnfFzPHYH0xtMg9k" alt="" width="563"><figcaption></figcaption></figure>

4. Fill in the required fields as follows:
   * **Type of data:** Cost and usage details (actual)
   * **Export name:** Enter any name you want for the export, such as economize\_export
   * **Dataset version:** 2021-10-01
   * **Frequency:** Daily export of month-to-date costs
   * **Export description:** Enter any description you want for the export
5. Click on **ADD + Next**.
6. Enter a unique name for **Export prefix**. (Azure uses this when it creates files in your storage account. It’s required so Azure can make sure every export it generates has a unique, organized name.)

<figure><img src="/files/QRrlySD8k3Ow4anFpd74" alt="" width="563"><figcaption></figcaption></figure>

{% hint style="info" %}

#### What it actually does

If you set:

```
Export prefix: export-cost
```

Azure will create blobs like:

```
export-cost/2026/02/01/...
export-cost/2026/02/02/...
```

{% endhint %}

6. Fill in the destination details as follows:
   * **Storage type:** Azure blob storage
   * **Destination and storage:** Choose **Use existing** or **Create new**, and fill in the information for fields (Subscription, Storage account, Container, and Directory) accordingly.
   * **Format:** CSV
   * **Compression type:** None
   * **File partitioning:** Set this to true
   * **Overwrite data:** Set this to true
7. Click on **Next** and then **Create** after reviewing the entered details.
8. When the export is created, run the export from the export page by selecting it and clicking **Run now**, once the run has been completed successfully it will indicate the same as follows:

<figure><img src="/files/z8IVvGSyjafTHhUPyIjQ" alt="" width="563"><figcaption></figcaption></figure>

10. Now, on the same page navigate to **Access control (IAM)**, and click on **+ Add**.

<figure><img src="/files/5XV9DZtcuYnPv0zD58Ls" alt="" width="563"><figcaption></figcaption></figure>

11. Select and grant the role **Billing account reader** to the application you created in the [first step](#step-1-create-a-new-application-registration).

<figure><img src="/files/6ifIFWjIWGB6wOhEHXKe" alt="" width="375"><figcaption></figcaption></figure>
{% endtab %}

{% tab title="Individual subscriptions" %}

1. Navigate to **Cost Management + Billing.**
2. Click **Export** under **Setting** in the left-hand menu.
3. Click **Scope**, then choose the subscription you want to onboard, which will appear as a key icon in front of its name. (Repeat the following steps 4-9 for each subscription you wish to onboard onto Economize.)

<figure><img src="/files/B75j4l8IbUeOl5cSbyN1" alt=""><figcaption></figcaption></figure>

4. From the Export screen, click **+ Create**, and select **Create your own export**.

<figure><img src="/files/3MqzZicazMjPVmMR98Ux" alt=""><figcaption></figcaption></figure>

5. Fill in the required fields as follows:
   1. **Type of data:** Cost and usage details (actual)
   2. **Export name:** Enter any name you want for the export, such as economize\_export
   3. **Dataset version:** 2021-10-01
   4. **Frequency:** Daily export of month-to-date costs
   5. **Export Description:** Enter any description you want for the export
6. Click on **ADD**.
7. Enter a unique name for **Export prefix**. (Azure uses this when it creates files in your storage account. It’s required so Azure can make sure every export it generates has a unique, organized name.)

   <figure><img src="/files/QRrlySD8k3Ow4anFpd74" alt="" width="563"><figcaption></figcaption></figure>

   <div data-gb-custom-block data-tag="hint" data-style="info" class="hint hint-info"><h4>What it actually does</h4><p>If you set:</p><pre><code>Export prefix: export-cost
   </code></pre><p>Azure will create blobs like:</p><pre><code>export-cost/2026/02/01/...
   export-cost/2026/02/02/...
   </code></pre></div>
8. Fill in the destination details as follows:
   * **Storage type:** Azure blob storage
   * **Destination and storage:** Choose to **Use existing** or **Create new**, and fill in the information for fields (Subscription, Storage account, Container, and Directory) accordingly.
   * **Format:** CSV
   * **Compression type:** None
   * **File partitioning:** Set this to true
   * **Overwrite data:** Set this to true
9. Click on **Next** and then **Create** after reviewing the entered details.
10. When the export is created, run the export from the export page by selecting it and clicking **Run now**, once the run has been completed successfully it will indicate the same as follows:

<figure><img src="/files/vfZ17LlPoS3vnIel9fan" alt=""><figcaption></figcaption></figure>
{% endtab %}
{% endtabs %}

## Step 5: Grant Economize **Reader and Data Access** permission <a href="#h_146f496ce7" id="h_146f496ce7"></a>

1. On the same page navigate back to the **Exports** tab under settings, and open up the export you just created, to click on the **Storage account** you used.

<figure><img src="/files/laOVNWjCay0mVIWgh9Oq" alt="" width="563"><figcaption></figcaption></figure>

3. Select **Access control (IAM)**.
4. Click **+Add** and then click **Add role assignment**.
5. Search for **Reader and Data Access**, select it, and then click **Next**.

<figure><img src="/files/EN9w1yAlwp3pa0zqQnV8" alt="" width="563"><figcaption></figcaption></figure>

6. Click **+ Select members** and search for the Economize service principal.
7. Select that Economize service principal and click **Select**.
8. Click **Review + Assign**.

## Step 6: Add configuration information to Economize console[​](https://docs.vantage.sh/connecting_azure#save-credentials) <a href="#save-credentials" id="save-credentials"></a>

After you complete all the above steps, add the **Application (client) ID, Directory (tenant) ID, & Client secret value,** you previously obtained, then click **Connect**.

<figure><img src="/files/lTb8Wuq60aMQ59yIfBLy" alt="" width="563"><figcaption></figcaption></figure>

{% hint style="success" %}
**SUCCESS**

The data can take up few minutes to fully propagate within the newly created export.

So, you might not be able to use all the features right away but you can still utilize the [Recommendations](https://docs.economize.cloud/product-features/recommendations) to start optimizing your costs.
{% endhint %}


# Onboarding OpenAI account onto Economize

After signing up with [Economize](https://www.economize.cloud/signup) to connect your OpenAI account, select the **Connect OpenAI** option when choosing your provider, and follow these steps:

<figure><img src="/files/jc1pqNsE8KszUF2JBJro" alt="" width="563"><figcaption></figcaption></figure>

## **Step 1: Create a Connection**

Economize integrates with your OpenAI account using the OpenAI [Costs API endpoint](https://platform.openai.com/docs/api-reference/usage/costs) and a read-only admin key.

1. Navigate to the [Admin Keys](https://platform.openai.com/settings/organization/admin-keys) page of the OpenAI console, and log in using your company email.
2. At the top, click **+ Create new Admin key**.
3. For **Name**, add a preferred name, like *Economize Integration*.
4. For **Permissions**, select **Read only**.
5. Click **Create admin key** and copy the generated key.

{% hint style="warning" %}
Do save your secret key in a safe place since you won't be able to view it again.
{% endhint %}

<figure><img src="/files/KSq4SfR8Vo3J7rgrIvHJ" alt="" width="563"><figcaption></figcaption></figure>

## Step 2: Add configuration information to Economize console <a href="#save-credentials" id="save-credentials"></a>

After you complete all the above steps, add the **API Name,** and **API Key** you previously obtained into the Economize console, then click **Connect**.

<figure><img src="/files/Xrz9X6yapWZiSsTZhTlQ" alt="" width="563"><figcaption></figcaption></figure>

{% hint style="success" %}
**SUCCESS**

It can take upto 15 minutes to ingest OpenAI costs. As soon as they are processed, they will be available within Economize.
{% endhint %}


# Onboarding Anthropic account onto Economize

After signing up with [Economize](https://www.economize.cloud/signup) to connect your Anthropic account, select the **Connect Anthropic** option when choosing your provider, and follow these steps:

<figure><img src="/files/PDOXEmrKolDgCKz34Z6N" alt="" width="563"><figcaption></figcaption></figure>

## **Step 1: Create a Connection**

Economize integrates with the Anthropic account using the Admin API through the [Usage and Cost API](https://docs.anthropic.com/en/api/usage-cost-api).

1. Sign in to the [Anthropic console](https://console.anthropic.com/dashboard).
2. In the left sidebar, under **Manage**, choose **API keys**.
3. Click **Admin keys**, then hit **+ Create Admin Key**.
4. Enter **Economize** as the key name and click **Add**.
5. Copy the newly created key. Admin keys start with `sk-ant-admin`.

<figure><img src="/files/qMDdFM5lXJfnLAmZkgg3" alt="" width="563"><figcaption></figcaption></figure>

## Step 2: Add configuration information to Economize console <a href="#save-credentials" id="save-credentials"></a>

After you complete all the above steps, add the **Admin Name,** and **Admin Key Value** you previously obtained into the Economize console, then click **Connect**.

<figure><img src="/files/Xzc6iZ4q7tr8b6QXTmEP" alt="" width="563"><figcaption></figcaption></figure>

{% hint style="success" %}
**SUCCESS**

It can take upto 15 minutes to ingest Anthropic costs. As soon as they are processed, they will be available within Economize.
{% endhint %}


# Single Sign-On (SSO)

Single Sign-On (SSO) is an authentication feature that allows you to access Economize using your existing organizational login credentials. This enhances security and the user experience by reducing password fatigue and simplifying access management.

<figure><img src="/files/lniL9nDE8gWQzwpRAzzm" alt=""><figcaption></figcaption></figure>

Economize supports several Identity Providers (IdPs) for SSO integration via SAML:

* Google Workspace
* Azure AD
* Okta
* JumpCloud

{% hint style="info" %}
If you do not see your IdP listed here, please contact [Economize Support](mailto:support@economize.cloud).
{% endhint %}

## Set up SSO with supported IdPs[**​**](https://docs.vantage.sh/sso#step-1-register-an-oauth-application-with-google) <a href="#set-up-other-idps" id="set-up-other-idps"></a>

{% tabs %}
{% tab title="Google Workspace " %}

#### Step 1: Register an OAuth Application with Google

* From the [Google API Console](https://console.developers.google.com/), select an existing project or click **CREATE PROJECT**.
* From the left navigation menu, click **Credentials**.
* At the top, click **CREATE CREDENTIALS** > **OAuth client ID**.

{% hint style="info" %}
If this is your first time working with this Google project, you will have to configure your consent screen. Follow [this](https://support.google.com/googleapi/answer/6158849) official Google documentation.
{% endhint %}

* For **Application type**, select **Web application**.
* Enter a **Name** for your application (e.g., *Economize*).
* For **Authorized JavaScript origins**, click **ADD URI** and enter `https://auth.economize.cloud`.
* For **Authorized redirect URIs**, click **ADD URI** and enter `https://auth.economize.cloud/login/callback`.
* Click **CREATE**.

<figure><img src="/files/CWlP66xn9XCKjXEsVjnu" alt="" width="563"><figcaption></figcaption></figure>

#### **Step 2: Obtain Application Credentials and Contact Economize Support**

* Copy your app's **CLIENT ID** and **CLIENT SECRET**.
* Contact [Economize Support](mailto:support@economize.cloud) for information on how to send these credentials to finish connecting with the Economize app.
  {% endtab %}

{% tab title="Azure AD" %}

#### **Step 1: Register an Application with Azure AD**

* From the Azure portal, navigate to **App registrations**, then click **New registration**.
* Enter a name for your app i.e., *Economize.*
* Set the **Supported account types** option to the appropriate setting for your organization.
* For **Redirect URI**, select **Web** and enter `https://auth.economize.cloud/login/callback`.
* Click **Register**.
* Once the app registration is complete, copy the **Application (client) ID** displayed on the app's **Overview** page to send to Economize.

<figure><img src="/files/pGxyWtrnplHPb8zNiA6D" alt="" width="563"><figcaption></figcaption></figure>

#### **Step 2: Generate a Client Secret​**

* On the left navigation, select **Certificates & secrets**.
* Under the **Client secrets** tab, click **New client secret**.
* Enter a description and select an expiration for the secret.

{% hint style="info" %}
If this secret expires, you will need to supply Economize with a new secret before the expiration date.
{% endhint %}

* Click **Add**.
* Copy the secret's **Value**.

<figure><img src="/files/g6WgWRS28FpygxPSirYc" alt="" width="563"><figcaption></figcaption></figure>

#### **Step 3: Add API Permissions**

* On the left navigation, select **API permissions**.
* Select **Add a permission**.
* Under the **Microsoft APIs** tab, find and select the appropriate permissions required by Economize i.e., `Directory.Read.All`, `User.Read`
* At the bottom, click **Add permissions**.

<figure><img src="/files/YIZprxzyaEexsuraK9oy" alt="" width="563"><figcaption></figcaption></figure>

#### **Step 4: Grant Admin Consent (If Required)**

* Still under **API permissions**, you may see a section for **Grant admin consent for {your domain}**.
* Click **Grant admin consent**, and follow the prompts.

<figure><img src="/files/PaaHPiwgbmtyJpuEWYIu" alt="" width="563"><figcaption></figcaption></figure>

#### **Step 5: Contact Economize Support**

* Contact [Economize Support](mailto:support@economize.cloud) for information on how to send the following items to finish the connection with the Economize app:
* Application (client) ID
* Client secret
* Azure AD Domain

{% hint style="info" %}
You can obtain your Azure AD Domain name on the **Overview** page of Azure Active Directory.
{% endhint %}
{% endtab %}

{% tab title="Okta" %}

1. Create an app integration on Okta.
2. For **Sign-in method**, select **SAML 2.0**. Click **Next**.
3. For **App Name**, enter *Economize*.
4. For **App Logo**, upload the [Econoimize Logo](https://ik.imagekit.io/economize/icon2-transparent_DLUlvcO3M.svg?updatedAt=1641901415871), then click **Next**.
5. Enter the requested **Single sign on URL** (i.e., `https://auth.economize.cloud/login/callback?connection=<company_name>-okta`) and **Audience URI (SP Entity ID)** (`urn:auth0:economizecloud:<company_name>-okta`).
6. Set the **Application username** to **Email**.
7. Once the app integration is set up, copy and save the Okta-provided **Identity Provider Single Sign On URL** and **X.509 Certificate.**
8. Contact [Economize Support](mailto:support@economize.cloud) for information on how to send the above items to finish the connection with the Economize app.
   {% endtab %}

{% tab title="JumpCloud" %}

#### **Step 1: Configure a New SAML Application**

* Sign in to your JumpCloud admin portal.
* Under **User Authentication**, click **SSO Applications**.
* Click **+** **Add New Application**.
* Click **Custom SAML Application**.
* Click **Next,** and select **Configure SSO with SAML** within the option **Manage Single Sign-On (SSO).**

<figure><img src="/files/ywr5LTJEegjkhZK4RVPL" alt="" width="563"><figcaption></figcaption></figure>

* Provide a **Display Label** i.e., E*conomize* and optional application information.
* For **User Portal Image**, upload the [Econoimize Logo](https://ik.imagekit.io/economize/icon2-transparent_DLUlvcO3M.svg?updatedAt=1641901415871), then click **Next**.
* Review and click on **Configure Application.**

#### **Step 2: Configure SAML Settings**

* **IdP Entity ID**: Enter `https://auth.economize.cloud`
* **SP Entity ID**: Enter `urn:auth0:economizecloud:<company_name>`
* **ACS URL:** Enter`https://auth.economize.cloud/login/callback?connection=<company_name>`
* Click **Save**.

#### **Step 3: Contact Economize Support**

* Contact [Economize Support](mailto:support@economize.cloud) for information on how to send the following items to finish the connection with the Economize app:
* IdP SSO URL
* Signing Certificate
  {% endtab %}
  {% endtabs %}


# Role-Based Access Control (RBAC)

Role-Based Access Control (RBAC) is a security mechanism implemented in Economize to manage user permissions. It allows administrators to control and restrict access to various features and data within the platform based on assigned roles.

## Available Roles

Economize offers two primary roles: Admin, and Member

<table data-card-size="large" data-column-title-hidden data-view="cards" data-full-width="false"><thead><tr><th>Role</th><th>Description</th><th>Key characteristics</th><th data-hidden data-card-cover data-type="files"></th></tr></thead><tbody><tr><td><strong>Admin</strong></td><td>Admins have full access to all projects data and features within Economize.</td><td><p></p><p>Key characteristics:</p><ul><li>Can view and manage all projects</li><li>Has access to all platform features</li><li>Can add, modify, or remove users</li><li>Can assign roles to other users</li></ul></td><td><a href="/files/qRQEyZB9XrvUrox6xD7u">/files/qRQEyZB9XrvUrox6xD7u</a></td></tr><tr><td><strong>Member</strong></td><td>Members have limited access and are restricted to specific assigned projects and features.</td><td><p></p><p>Key characteristics:</p><ul><li>Can view and interact with only assigned projects</li><li>Has access to assigned features</li><li>Cannot add, modify, or remove users</li><li>Cannot assign roles to other users</li></ul></td><td><a href="/files/Smx3oWJ5TI8jM7yCLiMn">/files/Smx3oWJ5TI8jM7yCLiMn</a></td></tr></tbody></table>

## Manage Account Access <a href="#manage-account-access" id="manage-account-access"></a>

Admin is the only role that can invite users to and remove users from Economize as well as change another user's role.

#### Add a new user

New users can be added to Economize through two methods: sending an email invitation or sharing a unique invite link.

1. From the sidebar, click **Settings**.
2. From the left navigation, select **Team Management.**
3. On the right, click on **+ Invite new member.**

#### Change a user's role

1. From the sidebar, click **Settings**.
2. From the left navigation, select **Team Management.**
3. In the table, pick the role or alter permissions you want to apply to a person in front of their name.


# Audit Logs

Audit Logs allow administrators to monitor user activities and gain insights into platform usage. This feature provides a detailed record of actions performed within and by the platform.

<figure><img src="/files/rxorcJZysU3b0npdB9TY" alt=""><figcaption></figcaption></figure>

## Information

The Audit Logs table displays the following information:

| Field           | Description                                                                                          |
| --------------- | ---------------------------------------------------------------------------------------------------- |
| **Timestamp**   | The exact date and time when an action occurred, formatted as "Day Month Date Year - HH:MM:SS".      |
| **Logs**        | A brief description of the action taken.                                                             |
| **Logs Type**   | The specific type or category of the log entry.                                                      |
| **Environment** | The scope or level at which the action occurred. i.e., organization, project, or user account level. |


# Dashboard

Once you set up a cloud provider integration, Economize will automatically begin ingesting billing information for your account. The default landing page in the Economize is the Overview page, providing a comprehensive snapshot of the cloud cost metrics that matter most to you.

The Economize dashboard contains several sections that help in monitoring key metrics of cloud spend as follows:

## **Summary Cards**

The dashboard features a set of summary cards at the top that provide a snapshot of key financial metrics like the total cost of the last 6 months, last month's cost accounted for before and after credits, and forecasted cost, which gives an estimate of the expected costs by the end of the current month, aiding in budget planning.

<figure><img src="/files/bL91ODW2BdMSY5UAW5CP" alt="" width="563"><figcaption></figcaption></figure>

## **Graphs**

**Organization Cost:**

This represents your organization's expenditures over the last 6 months. To view detailed information, just simply hover the cursor over the graph line and you will be presented with the respective data along with the credits breakdown list for that particular month.

**Breakdown by Services:**

This graph depicts the top five cloud service usages in prior months. Each hue in the graph represents a separate cloud service, as shown by the color-coded legends. To see the actual figures for any given month, simply hover the cursor over the graph line, and you will be presented with the specific expenditures of the services used. To convert between linear and bar chart types, use the drop-down option in the top-right corner of this graph.

## **Projects Spend Table**

This table lists individual projects and their associated costs for the last month, as well as the percentage increase or decrease in spending over the previous period. Each project also has a potential savings column that suggests possible savings opportunities.

<figure><img src="/files/vtmGYHnQnyXGslQ4W8pm" alt="" width="563"><figcaption></figcaption></figure>


# Explorer

The Explorer provides a comprehensive view of your cloud infrastructure and its associated costs after accessing your cloud environment. It comprises three powerful capabilities:

<figure><img src="/files/KOyAfKOcy4f0QtZS5zN4" alt="" width="563"><figcaption></figcaption></figure>

1. **Aerial View:** Aerial View allows you to see the monthly cost of specific projects and services used in an interactive sunburst chart.
2. **Resources:** The Resources table presents a detailed breakdown of your cloud resources, allowing you to analyze their configurations and corresponding costs.
3. **Unit Cost:** Unit Cost enables you to utilize labels to visually understand cloud expenses determining the cost per cloud entity.

To learn more about each of Explorer's capabilities, visit the following pages:

{% content-ref url="/pages/rpDXSYpk9zhsK8CxFOb1" %}
[Aerial View](/product-features/explorer/aerial-view)
{% endcontent-ref %}

{% content-ref url="/pages/vZpivvTwamUY1H1FllGm" %}
[Resources](/product-features/explorer/resources)
{% endcontent-ref %}

{% content-ref url="/pages/83LDEOB7EkJ72nAFbzgy" %}
[Unit Costs](/product-features/explorer/unit-costs)
{% endcontent-ref %}


# Aerial View

Aerial View allows you to see the monthly cost of specific projects and services used in an interactive sunburst chart.

Aerial view comprises 2 main components as follows that can be utilized to understand cloud costs better.

## Sunburst chart

The sunburst chart helps to visualize the cloud cost hierarchically. It shows hierarchy through a series of concentric rings, where each ring corresponds to a cloud resource. Furthermore, each ring is segmented proportionally to represent its constituent details.

<figure><img src="/files/U4TeUUF0FfEZfTnJbDdy" alt="" width="563"><figcaption></figcaption></figure>

To change the month for which the data is depicted, use the drop-down button at the top right corner. After selecting the desired month, the chart will gauge and represent all the aggregate costs of the projects and associated resources accordingly.

<figure><img src="/files/GyPdjSIsYpvglMQBKkla" alt="" width="208"><figcaption></figcaption></figure>

## Spend table

The expenditure table is located on the right, with the first row displaying the aggregate cost of all connected resources, followed by the expenses of those resources individually. To dig down further for a certain resource, simply click on it and the metrics will populate accordingly.

<figure><img src="/files/QGThn1kHSObrZzkq9jUY" alt="" width="375"><figcaption></figcaption></figure>


# Resources

{% hint style="info" %}
The Resources feature is currently supported for [GCP](/google-cloud/onboarding), and [AWS](/aws/onboarding) only.
{% endhint %}

Economize monitors active resources in your account for the connected cloud providers. This action generates an active resources report, which provides visibility into all the currently operational resources and the associated costs incurred by each resource. Resources examples include GCP VM Instances, Amazon S3 buckets, etc.

<figure><img src="/files/Eqz1dkIFbLTHjQjodyEi" alt=""><figcaption></figcaption></figure>

The Resources provide you with the following information and controls:

## Information

| Column                    | Description                                                |
| ------------------------- | ---------------------------------------------------------- |
| Resource name             | The unique identifier/ name of the resource                |
| Labels (GCP) / Tags (AWS) | Any tags or labels assigned to the resource                |
| Created on                | The date when the resource was created                     |
| Asset type                | The type of asset or cloud service the resource belongs to |
| Location                  | The assocaited location with the resource                  |
| Incurred cost             | The monetary cost associated with utilizing the resource   |

## Controls

| Control          | Use case                                                                                    |
| ---------------- | ------------------------------------------------------------------------------------------- |
| Project selector | Select the project for which data will be displayed                                         |
| Date selector    | Allows filtering the displayed data by selecting a specific month                           |
| Search bar       | Enables querying the data using resource name                                               |
| Filters          | Applies filters to narrow down the data displayed based on asset types or associated labels |

## How to enable Resources to analyze all assets within your cloud environment?

### GCP Resources

To analyze all assets in your GCP project you will need to enable the [**Cloud Asset API**](https://console.cloud.google.com/marketplace/product/google/cloudasset.googleapis.com) within the GCP console for that specific project, which manages the history and inventory of all resources helping you to discover, monitor, and analyze all your assets in one place.

<figure><img src="/files/C6Aq4gahVymFGEPSlPtn" alt="" width="563"><figcaption></figcaption></figure>

### AWS Resources

To analyze all resources in your AWS account you will need to enable [**AWS Resource Explorer**](https://resource-explorer.console.aws.amazon.com/resource-explorer/home#/home) within the AWS console, as it helps to efficiently search for and discover your resources across AWS Regions and accounts.

Refer to the official AWS documentation below to learn how to Set up and configure AWS Resource Explorer:

{% embed url="<https://docs.aws.amazon.com/resource-explorer/latest/userguide/getting-started-setting-up.html>" %}

To enable Resource Explorer across multiple integarted accounts with Economize at once, follow the following steps:

1. Navigate to [Quick Setup](https://us-east-1.console.aws.amazon.com/systems-manager/quick-setup?region=us-east-1) within the Systems Manager console.
2. Click on **Get started**.

<figure><img src="/files/JC4YyboBX5qPEnfJAdrV" alt="" width="563"><figcaption></figcaption></figure>

3. Choose **Config Recording**.

<figure><img src="/files/amTYRcyUEnZMrxLqxrZF" alt="" width="375"><figcaption></figcaption></figure>

4. Let all the configuration settings remain as default.
5. Click on **Create**.

<figure><img src="/files/ygmVQKrCHuqcsS02TT6E" alt="" width="208"><figcaption></figcaption></figure>


# Unit Costs

A *unit* is an entity that is a part of your cloud environment, such as projects, services, skus, etc.

Unit costs help in determining the cost per cloud entity by utilizing the labeled resources in your cloud projects. The Unit cost feature provides you with the following information and controls:

## Information

The unit costs can be visualized in two different ways as per your preference, i.e., Treemap or Table.

<figure><img src="/files/LogbnxLdlMnNgdBbSA1R" alt=""><figcaption></figcaption></figure>

## Controls

<figure><img src="/files/z25BCMY1LHmlIX8jpO5k" alt=""><figcaption></figcaption></figure>

| Control                             | Use case                                                                                                                                                                                                             |
| ----------------------------------- | -------------------------------------------------------------------------------------------------------------------------------------------------------------------------------------------------------------------- |
| Date selector                       | Allows filtering the displayed data by selecting a specific month                                                                                                                                                    |
| Formatted as (visualization format) | Specify the desired format for visualizing the data, i.e., Treemap or Table.                                                                                                                                         |
| With credits                        | When switched off, it displays the cost subtotal for which you are accountable, i.e., the actual cost minus discounts or promotions                                                                                  |
| Select a label to load as dimension | Any chosen labelled resource from this section of your cloud projects will load as a dimension                                                                                                                       |
| Dimensions                          | Dimensions are labels representing cloud entities that serve as the building blocks for unit cost breakdown analysis. You can add up to three dimensions max, and can further apply a filter over the selected label |


# Reports

The Reports offer comprehensive insights into cloud usage and spending, allowing you to effortlessly slice and dice your complicated cloud cost data.

<figure><img src="/files/dT7tfDNTVL2vYLVrohLY" alt=""><figcaption></figcaption></figure>

The Reports provide you with the following information and controls:

## **Information**

**Summary cards:**

The top of the page displays the following four KPIs for the selected project:

* Total spend (last month)
* Total spend (this month so far)
* Services used
* Total potential savings

**Tabs:**

You can control the provided data by selecting the tabs for the following entities:

| Tab                                   | Use Case                                                                                     |
| ------------------------------------- | -------------------------------------------------------------------------------------------- |
| Projects (GCP)/ Accounts (AWS)        | Shows the cost associated with each project or account                                       |
| Services                              | Shows the cost associated with individual used service in your cloud environment             |
| SKUs                                  | Shows the cost associated with each used SKU in your cloud environment                       |
| Labels (GCP)/ Tags (AWS)              | Shows the cost associated with each label or tag in your cloud environment                   |
| Networking (GCP)/ Data Transfer (AWS) | Shows the associated cost or usage for networking or data transfer in your cloud environment |

For GCP projects you can also analyze the cost breakdown for the following specific services:

<table data-full-width="false"><thead><tr><th>Services</th><th>Use Case</th></tr></thead><tbody><tr><td>BigQuery</td><td>Shows the BigQuery costs associated with a project which can be further analyzed based on Top queries, Top datasets, Top tables, and Top users<br><br><a data-mention href="/pages/HjmPT8IvlkJF7XAXOmQZ">/pages/HjmPT8IvlkJF7XAXOmQZ</a></td></tr><tr><td>Google Kubernetes Engine (GKE)</td><td>Shows the GKE costs associated with a project which can be further analyzed based on Cluster costs, Namespace costs, Label costs, and Cluster details<br><br><a data-mention href="/pages/g17quQ9Smcyjb84iYOFZ">/pages/g17quQ9Smcyjb84iYOFZ</a></td></tr><tr><td>Cloud Logging</td><td>Provides Cloud Logging breakdown for the cost and volume of a project</td></tr></tbody></table>

## Controls

{% hint style="info" %}
Amortization support is available exclusively for **AWS** alone right now.
{% endhint %}

| Control                             | Use Case                                                                                                                           |
| ----------------------------------- | ---------------------------------------------------------------------------------------------------------------------------------- |
| Project selector                    | Select the project for which data will be displayed                                                                                |
| Formatted as (visualization format) | Specify the desired format for visualizing the data, such as table, bar chart, pie chart, or line chart                            |
| During (Date selector)              | Select a specific date range for filtering the data                                                                                |
| Grouped as                          | Groups the data based on a daily, weekly, or monthly basis                                                                         |
| With credits                        | When switched on, it displays the cost subtotal for which you are accountable, i.e., the actual cost minus discounts or promotions |
| Amortized                           | Distributes costs evenly across time, rather than showing them only when expenses occur.                                           |
| Filters                             | Applies filters to narrow down the data displayed based on specific criteria                                                       |
| Add to views                        | Enables to save the current data configuration to a customized [view](/product-features/views)                                     |
| Download as CSV                     | Download the data in CSV format for further analysis                                                                               |


# Recommendations

Economize’s Recommendations Engine provides actionable insights and suggestions to optimize cloud spend and is accessible from the sidebar of the Economize console.&#x20;

The application begins crawling all of the resources in your onboarded project as soon as you integrate it and provides you with suggestions to reduce your cloud spend.

<figure><img src="/files/B2mxH3KMr4UHANymUltp" alt=""><figcaption></figcaption></figure>

The Recommendations provide you with the following information and controls:

## **Information**

* **Total recommendations** available.
* **Potential savings** per month across all the projects if you apply the recommendations.
* **Resources crawled** across your projects.
* Each recommendation breakdown displays the following information:

<table data-full-width="false"><thead><tr><th width="242">Data</th><th>Description</th></tr></thead><tbody><tr><td>Resource name</td><td>Name of the resource for which the recommendation is generated.</td></tr><tr><td>Estimated savings</td><td>Potential monthly savings, if you apply that recommendation.</td></tr><tr><td>Description</td><td>Explaining the recommendation why and how it will save you on your cloud bill.</td></tr><tr><td>Region</td><td>Where that particular resource is located.</td></tr><tr><td>Recommended action</td><td>The intended action that needs to be taken to apply the recommendation. </td></tr></tbody></table>

## **Controls**

* You can easily manage all the recommendations using separate tabs. If you want to save a particular recommendation for future reference you can use the star icon which will move that to the **Saved Recommendations** tab. In case if you do not want to act on a suggestion you have the option to move it to the **Dismissed Recommendations** tab by using the trash icon.
* You can filter by resource type or associated labels, and sort by available savings.
* Additionally, you get the functionality to share any recommendation by copying the shareable link for it as well as downloading the generated recommendations as a CSV file.


# Incidents

## **Overview**

The Incidents page serves as a log of estimated average costs and compares it to the actual resource usage. Whenever the usage rises over a certain threshold, it is recorded as an anomaly. This data is essential for cost optimization, as it allows users to see where their costs are abnormally high, and investigate the factors that cause it. The Anomaly Alerts page can be accessed from the menu present on the dashboard.

<figure><img src="/files/ciUNcw57lXsfFqxpzVET" alt=""><figcaption></figcaption></figure>

While viewing cost anomalies, any unexpected rise over a predicted threshold is marked with a yellow blip on the line graph. The lightly transparent blue highlight is a representation of the average costs, and the higher and lower limits of the predicted cost estimations. To view detailed data for a particular event, users can hover their cursor and see the presented details in a black dialogue box. To change time intervals, users may choose from the Weekly, Bi-Weekly, and Monthly options at the top of the graph.


# Views

Views is a powerful feature that provides users with the ability to save and organize datasets or visualizations for future use and it can be easily accessed from the top right menu available on the dashboard.

<figure><img src="/files/wyaZWF18vgYL8ANUSBrR" alt=""><figcaption></figcaption></figure>

With this feature, users can customize and arrange their views as per their preferences, allowing them to quickly access the data they need without having to recreate their visualizations or filters from scratch each time. By saving and organizing their views, users can easily share their work with others, streamline their workflow, and increase productivity.


# Notifications

Notifications feature is designed to keep you informed about cloud costs and usage patterns. This proactive system can provide regular updates on cloud usage and is capable of alerting you when cloud expenditure exceeds predefined thresholds or unusual spending patterns are detected. By leveraging notifications, you can stay on top of your cloud costs, quickly identify potential issues, and take timely action to optimize cloud resources.

Economize offers three types of notifications to cater to different user needs:

<figure><img src="/files/v8x112vPW0G75vxAAGkv" alt=""><figcaption></figcaption></figure>

1. **Alerts:** Alerts are triggered by specific events or conditions. They are further divided into two subtypes:
   * *Cost Alerts:* Cost alerts are triggered when cloud spending reaches or exceeds predetermined thresholds. You can set custom limits for different time periods or specific resources, ensuring you're notified of any unexpected cost increases.&#x20;
   * *Anomaly Alerts:* Anomaly alerts use advanced algorithms to detect unusual patterns in cloud usage or spending. These alerts help to identify potential issues such as misconfigured resources or unexpected resource usage.
2. **Budgets:** Budgets let organizations set financial expectations for cloud resources based on planned usage and goals, allowing teams to anticipate costs and prevent surprises.
3. **Summaries:** Summaries provide regular updates on cloud usage and costs. These periodic reports give a comprehensive overview of cloud spending, helping in tracking trends and making informed decisions about resource allocation.

To learn more about each of the Notifications capabilities and how to configure them, check out the following pages:

{% content-ref url="/pages/3f5irujL866p6P5ddooQ" %}
[Alerts](/product-features/notifications/alerts)
{% endcontent-ref %}

{% content-ref url="/pages/21h32dSQL7DP45If5o1G" %}
[Budgets](/product-features/notifications/budgets)
{% endcontent-ref %}

{% content-ref url="/pages/7wynXFsjPMsCN4HjTnKt" %}
[Summaries](/product-features/notifications/summaries)
{% endcontent-ref %}


# Alerts

Alerts are triggered when cloud spend exceeds predefined thresholds or when unusual cost patterns are identified. There are two types of alerts available:

1. **Cost Alerts:** Notifies when spending reaches or surpasses set limits.&#x20;
2. **Anomaly Alerts:** Detect and report unusual spending patterns or sudden cost spikes, using advanced algorithms.

## Information included

Alerts typically include the following data:

<figure><img src="/files/IYZVAgYaqlvEPMNBhVlJ" alt=""><figcaption><p>Cost alert sent to Slack channel</p></figcaption></figure>

| Data                 | Description                                                 |
| -------------------- | ----------------------------------------------------------- |
| Cost deviation       | Indicates the spike or drop in costs                        |
| Projects or accounts | Specifies the projects or accounts affected                 |
| Resource affected    | Identifies the affected services, labels, or SKUs           |
| Percentage change    | Shows the percentage increase or decrease in costs          |
| Cost difference      | Provides the absolute cost difference                       |
| Time period          | Defines the time period over which the cost change occurred |

## Creating an Alert

Navigate to Notifications from the [Economize console](https://www.economize.cloud/app/login) sidebar, and follow the instructions below:

{% hint style="info" %}
The available fields within the Create alerts modal will dynamically update based on the selected alert type, ensuring only relevant options gets configured.
{% endhint %}

{% stepper %}
{% step %}

### Enter Details

* **Alert name:** Enter a descriptive name for your alert.
* **Alert type:** Select from *Cost Alert* or *Anomaly Alert* as the alert type.
* **For:** Choose what the alert should monitor, i.e., Projects, Services, Labels, or SKUs.
* **Filter:** Define the specific resources within the selected criteria of *the "For"* field above.
* **Time Range:** Select how often you want to receive alerts, i.e., daily, weekly, or monthly.

<figure><img src="/files/bOIW61FYGPkDcUJgR1Nr" alt=""><figcaption></figcaption></figure>
{% endstep %}

{% step %}

### Define Scope

* **Threshold:** Set a threshold amount that will trigger the alert.
* **Ignore spend below (optional):** Set a minimum amount to avoid triggering alerts for insignificant or small costs.
* **Include Credits:** Determines whether any applied credits should be factored into cost calculations for alerts.
* **Include Cost DropS:** Choose if you want to be notified of cost decreases as well.
* **Amortization:** Distributes costs evenly across time, rather than recording them only when expenses occur.

{% hint style="warning" %}
Amortization support is available exclusively for **AWS** alerts alone right now.
{% endhint %}

<figure><img src="/files/Td5NtPJTdmls6HThjhP2" alt=""><figcaption></figcaption></figure>
{% endstep %}

{% step %}

### Specify Destination

{% hint style="info" %}
Alerts can be routed to multiple channels or destinations across any [supported integration](/integrations/overview). This makes it easy to deliver them to different teams, projects, or groups, depending on your organizational needs. Simply select the desired destinations and channels from the dropdown menu during configuration.&#x20;

![](/files/Yn61PcKLEpzbRdOT4JS5)
{% endhint %}

* **Destination:** Select the workspace tools where you want to receive the budget from the available [integrations](/integrations/overview).
* **Channel:** Select the specific channels within the chosen destinations.
  {% endstep %}
  {% endstepper %}


# Budgets

Budget enables you to track your actual spend against your planned spend by defining spending limits.

<figure><img src="/files/30vqlQOtCgMBaFjaNYbn" alt=""><figcaption></figcaption></figure>

## Creating a Budget

To create a budget, navigate to Notifications from the [Economize console](https://www.economize.cloud/app/login) sidebar, and follow the below steps:

{% stepper %}
{% step %}

### Enter Details

* **Budget name:** Enter a descriptive name for your budget.
* **For:** Choose what the budget should monitor, i.e., Projects, Services, Labels, or SKUs.
* **Filter:** Define the specific resources within the selected criteria of *the "For"* field above.
* **Time Range:** Define the frequency for the budget, i.e., daily, weekly, or monthly.

<figure><img src="/files/bH639X7DZbB0Z7FstSAt" alt=""><figcaption></figcaption></figure>
{% endstep %}

{% step %}

### Define Scope

* **Include Credits:** Choose whether to subtract available credits from your actual spend when tracking the budget.
* **Target Amount:** Set the amount that you will compare your actual spend against.
* **Threshold:** Define alert triggers to notify you when spending exceeds a certain percentage or amount of the budget.

<figure><img src="/files/QYblHnfEFB8FrihBGMgX" alt=""><figcaption></figcaption></figure>
{% endstep %}

{% step %}

### Specify Destination

{% hint style="info" %}
Budgets can be routed to multiple channels or destinations across any [supported integration](/integrations/overview). This makes it easy to deliver them to different teams, projects, or groups, depending on your organizational needs. Simply select the desired destinations and channels from the dropdown menu during configuration.&#x20;

![](/files/Yn61PcKLEpzbRdOT4JS5)
{% endhint %}

* **Destination:** Select the workspace tools where you want to receive the budget from the available [integrations](/integrations/overview).
* **Channel:** Select the specific channels within the chosen destinations.

<figure><img src="/files/vOxSiLMvjwHt2tf7ftvc" alt=""><figcaption></figcaption></figure>
{% endstep %}
{% endstepper %}


# Summaries

Summaries are detailed cost analysis reports that provide comprehensive insights into cloud spending patterns and trends sent to your [configured channels](/integrations/overview) recurringly.&#x20;

## Information included

Summaries typically include the following but are not limited to data:

| Data                                                            | Description                                                                                                                               |
| --------------------------------------------------------------- | ----------------------------------------------------------------------------------------------------------------------------------------- |
| Summary meta data                                               | <ul><li>Week/ Month</li><li>Project name</li><li>Comparison to the previous period's cost</li><li>Current period's cost to date</li></ul> |
| Detailed component-wise breakdown of costs                      | An itemized list of costs for each cloud service or component, along with percentage change compared to the previous configured period    |
| Anomaly chart showing actual costs vs. expected range over time | Visual graph depicting actual spending patterns compared to the predicted range, helping to identify unusual cost fluctuations            |

## Creating a Summary

To create a summary, navigate to Notifications from the [Economize console](https://www.economize.cloud/app/login) sidebar, and follow the below steps:

{% stepper %}
{% step %}

### Enter Details

* **Summary name:** Enter a descriptive name for your summary.
* **Project name:** Select all or a specific project from the dropdown menu.
* **Time Range:** Choose how often you want to receive the summary i.e., weekly or monthly.

<figure><img src="/files/qh9Hdy04RhqvHaP0sLF3" alt="Summary Modal"><figcaption></figcaption></figure>
{% endstep %}

{% step %}

### Specify Destination

{% hint style="info" %}
Summaries can be routed to multiple channels or destinations across any [supported integration](/integrations/overview). This makes it easy to deliver them to different teams, projects, or groups, depending on your organizational needs. Simply select the desired destinations and channels from the dropdown menu during configuration.&#x20;

![](/files/Yn61PcKLEpzbRdOT4JS5)
{% endhint %}

* **Destination:** Select the workspace tools where you want to receive the summary from the available [integrations](/integrations/overview).
* **Channel:** Select the specific channels within the chosen destinations.

<figure><img src="/files/wokv8oRRKjxBVVuOJBlE" alt=""><figcaption></figcaption></figure>
{% endstep %}
{% endstepper %}


# Overview

Economize enables you to connect with a variety of chat and collaboration apps, including Slack, Discord, Zulip, Google Chat, and Microsoft Teams. Integrating with your preferred workspace lets you get notified whenever configured [notifications](/product-features/notifications) are triggered. To set up an integration, go to the [integrations](https://www.economize.cloud/app/settings/integrations) page within settings.

Learn more about how to set up a webhook integration for your preferred communication app:

{% content-ref url="/pages/vSR9SItOhzYqsIabtAwT" %}
[Slack](/integrations/slack)
{% endcontent-ref %}

{% content-ref url="/pages/wEjIq5Toary3A7i6xicO" %}
[Discord](/integrations/discord)
{% endcontent-ref %}

{% content-ref url="/pages/PA8pQbQgkN03ZGYYmti4" %}
[Microsoft Teams](/integrations/microsoft-teams)
{% endcontent-ref %}

{% content-ref url="/pages/L4yCN3q8qTgnL8FjjKXC" %}
[Google Chat](/integrations/google-chat)
{% endcontent-ref %}

{% content-ref url="/pages/C7RiYZLQb2necDDiYnDl" %}
[Zulip](/integrations/zulip)
{% endcontent-ref %}


# Slack

Follow the below steps to integrate your Slack workspace with Economize, allowing you to receive configured [notifications](/product-features/notifications) in your preferred channel.

1. Navigate to the [integrations](https://www.economize.cloud/app/settings/integrations) page in the settings of the Economize console.
2. Click on the **Configure** button for Slack.

<figure><img src="/files/YAxYJUEDuleE5qX4oCqu" alt="" width="464"><figcaption></figcaption></figure>

3. You can view already connected Slack channels or add new ones by clicking on the **+ Add workspace** button.

<figure><img src="/files/Va1LX1BKS1PJIfgoT0Tx" alt="" width="563"><figcaption></figcaption></figure>

3. You will now be redirected to your Slack workspace and will be asked to grant permission to access your account. You will see a message stating: **Economize requires a channel to post to as an app.** Choose the channel in which you want to receive notifications to be sent from the menu and click on the **Allow** button.

<figure><img src="/files/E3nJCY1VhtGEONHKaISZ" alt="" width="563"><figcaption></figcaption></figure>

5. Once the channel is connected, you will be redirected back to the Economize console.


# Discord

Follow the below steps to integrate Discord with Economize, allowing you to receive configured notifications in your preferred channel.

## Step 1: Create a webhook

1. Navigate to your Discord server and select the channel where you want to receive notifications from Economize.
2. Click on the settings icon for the channel to create a webhook URL and select **Integrations**.

<figure><img src="/files/JYCr19RzMxtZlrFW4sRr" alt=""><figcaption></figcaption></figure>

3. Click on the **Create Webhook** button to create a webhook for the channel.

<figure><img src="/files/mxyFRxcTP1D79WtryVDr" alt="" width="563"><figcaption></figcaption></figure>

4. Once the Webhook is been created copy its URL by clicking on **Copy Webhook URL** button.

<figure><img src="/files/UjmUwqEVyndZXnd5AoQ1" alt="" width="563"><figcaption></figcaption></figure>

## Step 2: Link the webhook with Economize

1. Navigate to the [integrations](https://www.economize.cloud/app/settings/integrations) page in the settings of the Economize console.
2. Click on the **Configure** button for Discord.

<figure><img src="/files/1oezxiz6HWPq2vpZkrpa" alt="" width="444"><figcaption></figcaption></figure>

3. You can view already connected webhooks or add new ones by clicking on the **+ Add workspace** button.

<figure><img src="/files/DvLk44WiYYiNtyxaL4G6" alt="" width="563"><figcaption></figcaption></figure>

4. Enter the information of the webhook you created earlier, including its URL and name.

<figure><img src="/files/QxXMQhFDVIMUV41b4CtM" alt="" width="563"><figcaption></figcaption></figure>

5. Click on the **Connect** button.
6. Once the webhook is connected, you will be redirected back to the Economize console.


# Microsoft Teams

Follow the below steps to integrate Microsoft Teams with Economize, allowing you to receive configured [notifications](/product-features/notifications) in your preferred channel.

## Step 1: Create a webhook

Refer to the official Microsoft Teams documentation below to create a webhook for the channel where you want to receive the notifications.

{% embed url="<https://learn.microsoft.com/en-us/microsoftteams/platform/webhooks-and-connectors/how-to/add-incoming-webhook?tabs=newteams,dotnet#create-an-incoming-webhook>" %}

## Step 2: Link the webhook with Economize

1. Navigate to the [integrations](https://www.economize.cloud/app/settings/integrations) page in the settings of the Economize console.
2. Click on the **Configure** button for Microsoft Teams.

<figure><img src="/files/ZeQ1YtqP0nembrKC6x0Y" alt="" width="443"><figcaption></figcaption></figure>

3. You can view already connected webhooks or add new ones by clicking on the **+ Add workspace** button.

<figure><img src="/files/0ptuugGYUJ7y5Y86anZL" alt="" width="563"><figcaption></figcaption></figure>

4. Enter the information of the webhook you created earlier, including its URL and name.

<figure><img src="/files/W27NBiKpOZdv9PuHbJNA" alt="" width="563"><figcaption></figcaption></figure>

5. Click on the **Connect** button.
6. Once the webhook is connected you will be redirected back to the Economize console.


# Google Chat

Follow the below steps to integrate Google Chat with Economize, allowing you to receive configured [notifications](/product-features/notifications) in your preferred channel.

## Step 1: Create a webhook

Refer to the official Google chat documentation below to create a webhook in the chat space where you want to receive the notifications.

{% embed url="<https://developers.google.com/workspace/chat/quickstart/webhooks#register_the_incoming_webhook>" %}

## Step 2: Link the webhook with Economize

1. Navigate to the [integrations](https://www.economize.cloud/app/settings/integrations) page in the settings of the Economize console.
2. Click on the **Configure** button for Google Chat.

<figure><img src="/files/L16KWx7AmEVYxfn8bheo" alt="" width="449"><figcaption></figcaption></figure>

3. You can view already connected webhooks or add new ones by clicking on the **+ Add workspace** button.

<figure><img src="/files/FlncMwQQbRONtuvBoq8c" alt="" width="563"><figcaption></figcaption></figure>

4. Enter the information of the webhook you created earlier, including its URL and name.

<figure><img src="/files/4puunBQhKAWq9mbtElLC" alt="" width="563"><figcaption></figcaption></figure>

4. Click on the **Connect** button.
5. Once the webhook is connected, you will be redirected back to the Economize console.


# Zulip

Follow the below steps to integrate Zulip with Economize, allowing you to receive configured [notifications](/product-features/notifications) in your preferred stream.

1. **Create a Zulip account:**

* Go to the Zulip website (<https://zulip.com/>) and create an account.
* After creating the account, log in to your Zulip account.

2. **Create a Zulip Stream:**

* In Zulip, streams are used to organize conversations around specific topics. Therefore, you need to create a stream in Zulip that will be used to receive notifications from Economize.
* Click on the gear icon on the top right corner of the Zulip interface, and select `Manage Streams`.

<figure><img src="/files/TcFraLM8mxdsHrB6VIV7" alt=""><figcaption></figcaption></figure>

* Click on the `Create Stream` button and give the stream a name (e.g., Economize).

<figure><img src="/files/lEPKZcDcuO9nF7Hzp2lH" alt=""><figcaption></figcaption></figure>

* Once the stream is created, note down the name of the stream as it will be used in the integration process.

3. **Obtain Zulip Email and API Key:**

* To send messages to the Zulip stream, you will need to use the Zulip Email and API key.
* In Zulip, click on the gear icon on the top right corner of the Zulip interface, and select `Settings`.
* Scroll down to the `Personal settings` section and navigate to the `Bots` section.

<figure><img src="/files/aEFDBdr1GIHFPz2tyTHj" alt=""><figcaption></figcaption></figure>

* You can create a new bot or use an existing one as per your liking.
* Copy the `Bot Email` & `API Key` as it will be needed later

4. **Configure Economize:**

* Log in to your Economize account and navigate to `Settings -> Integrations`.
* In the Integrations settings, click on `Manage Integration` for Zulip.

<figure><img src="/files/tMKLL5dN2By0ndkcrkwY" alt=""><figcaption></figcaption></figure>

* You will be presented with existing Zulip Streams which have been added before, in order to add a new one, simply click on `Add Zulip Integration` button.

<figure><img src="/files/NghnZORJ4WZRmknK2ZwD" alt=""><figcaption></figcaption></figure>

* Enter the Zulip Email, Zulip API key, and the Zulip stream name you created earlier in the respective fields.

<figure><img src="/files/YPbetZEUQXVieF5TiVKY" alt=""><figcaption></figcaption></figure>

* Enter the Zulip URL (e.g., <https://sample-org.zulipchat.com/api/v1/messages>) in the URL field.
* Click on the **Connect** button.


